unbricking six google wifi pucks for $7, by rubberducking claude past every wall
I had six bricked Google WiFi pucks. Claude was sure five of them needed a $30 SPI programmer and an older coreboot that nobody publishes. I was poking around the open case looking for any other angle when, channeling my former engadget-reading i-void-warranties self, I noticed a silver screw with a conductive washer next to the H1 chip. Pulled it. Told Claude. Turned out that was basically the whole game.
tl;dr
Six discontinued Google WiFi pucks (model AC-1304, codename Gale). I wanted to mesh them with OpenWrt. The first one flashed in twenty minutes following the standard kkestell guide. The other five did the boot dance, briefly answered ping, then reverted to a purple LED loop. Forum consensus: they’re walled by a newer Google firmware that refuses unsigned USB boot. The accepted remedies were a CH341A SPI programmer plus an older coreboot image nobody publishes, or “buy more pucks.”
Both of those felt bad. So I rubberducked Claude for a while and bought a $7 cable. The actual fix turned out to be: open the case, pull out the write-protect screw that was already on the mainboard, log into the chronos shell over the puck’s debug UART, run enable_dev_usb_boot, and from there the normal kkestell flow works. The wall isn’t a signature-enforcement wall, it’s a “the auto-updated firmware doesn’t ship flashrom so the script that sets the unlock flag silently no-ops” wall. Dumb, fixable, took an afternoon to figure out per puck the first time and ten minutes per puck after.
Below is the actual journey, including three rabbit holes Claude and I went down before noticing the screw.
the setup
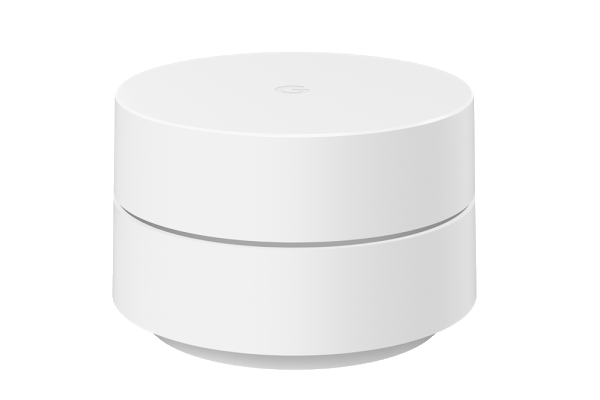 The puck. Google WiFi AC-1304, codename Gale. Image: OpenWrt wiki, CC BY-SA 4.0.
Verizon FiOS on Long Island, six pucks from the era when these were the cool mesh option. Google killed the Google WiFi app this year, the pucks are EOL, stock firmware works but has nothing I want (no SQM, no DNS-level adblock, no ssh). OpenWrt 25.12.4 has been a supported target for this hardware forever.
The published procedure (kkestell’s guide, papdee’s OpenWrt forum thread, the OpenWrt wiki page for Gale) is simple:
- Open the puck, find the internal switch called SW7.
- Boot a Chromium-OS-style USB drive containing the OpenWrt factory image.
- SSH into it at 192.168.1.1, dd that image onto the internal eMMC, reboot.
I followed it on the puck that lives in my office. Worked first try. It now serves the house as gw-main, running cake SQM at 285 down / 285 up against a baseline of 263ms bufferbloat. Felt great.
Tried the same procedure on every other puck. None of them worked. Every single one: hold reset, plug power, LED amber, release, press SW7, LED rapid-blue (depthcharge reading the USB stick), then solid blue (kernel loads), then twenty purple blinks, breathing purple, reboot, repeat.
I dug. Found the 2026-05-22 entry of the openwrt-on-google-wifi forum thread where someone reports exactly this. The theory: pucks that were online for years auto-updated to a newer Google firmware with a stricter signature-enforcement step. Reflashing via Google’s “OnHub Recovery Utility” Chrome extension doesn’t help (the extension only ships the latest). Galeforce, the rooted Google fork, gets reverted too. CH341A on the SPI chip would work in theory but needs an older Gale coreboot, which nobody has published.
Sat with that for a few days. Then I bought the cable.
the cable
SuzyQ (sometimes “SuzyQable”). Passive USB-A to USB-C adapter with very specific resistors on the CC lines. Plug the USB-C end into a compatible target’s USB-C port and the resistors flip it into “Debug Accessory Mode” so the target exposes itself as a USB device with bulk endpoints for the on-board debug consoles. Google uses the same trick on Chromebooks, so all the documentation is Chromebook-centric.
Bought one from a seller called chocolateloverraj on eBay, $7.32 shipped. Same person publishes the open hardware on GitHub, 2,197 sold at the time I ordered. Shows up two days later in a tiny envelope. Something deeply satisfying about a piece of debug hardware that fits in your palm.
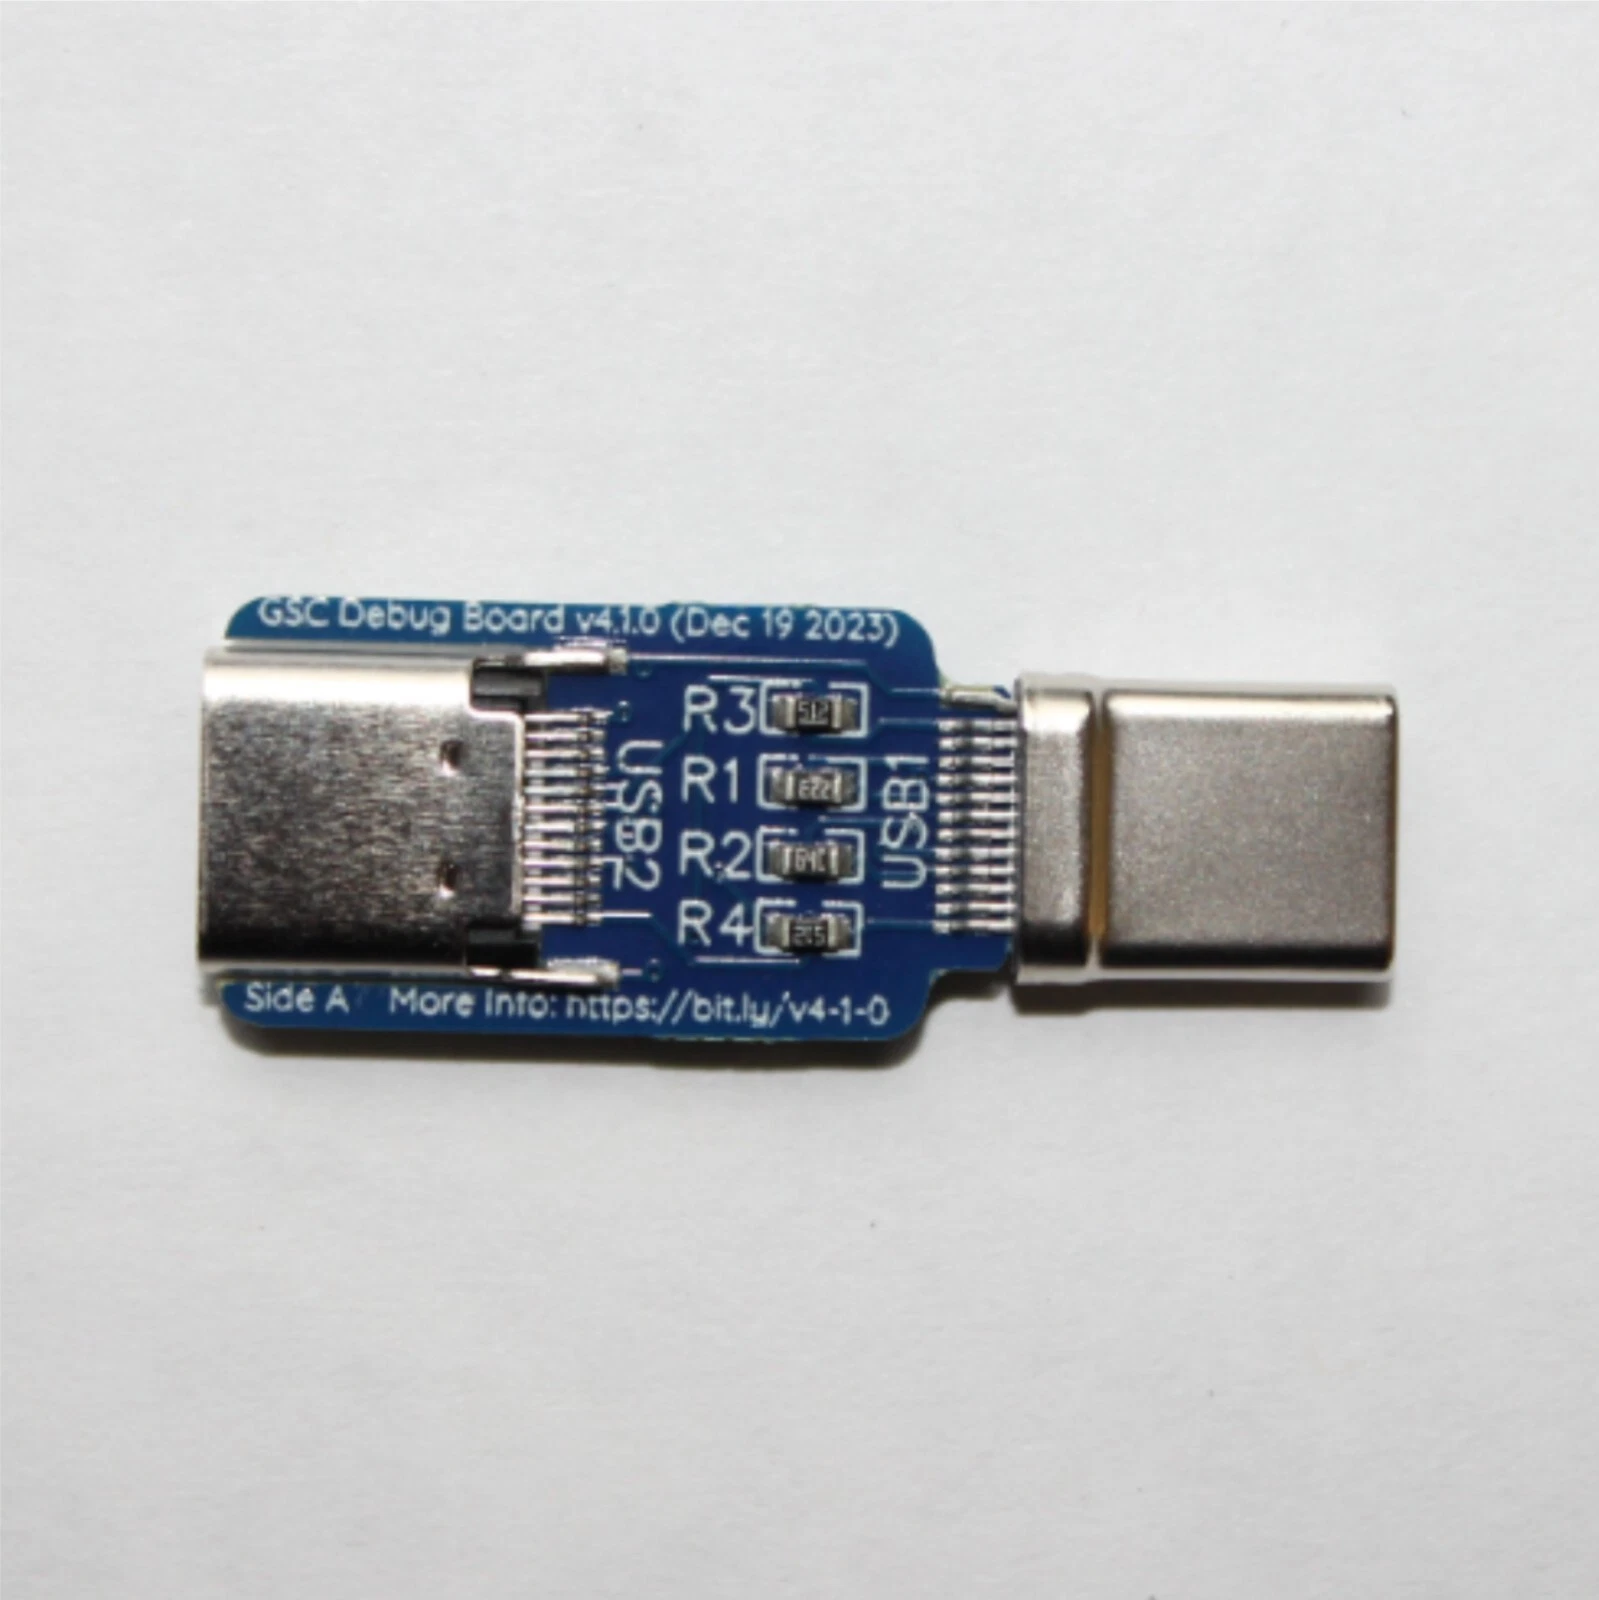 The cable, “GSC Debug Board v4.1.0 (Dec 19 2023)”. USB-C left, USB-A right, the four resistors in the middle are what trick the puck into Debug Accessory Mode. Image: chocolateloverraj’s eBay listing.
The puck has one USB-C port so the SuzyQ shares it with power. The cable provides 500 mA at 5V over the USB-A side and that’s enough to boot the puck on its own. Blue LED, no separate brick.
macOS pretends the cable doesn’t exist
Plug SuzyQ into a Mac. Plug the USB-C end into a Gale puck. Run ls /dev/cu.*. Nothing.
Run ioreg -p IOUSB -l -w 0 | grep "Gale debug" and there it is: Google Inc. (0x18d1) / "Gale debug" (0x500f) with three USB interfaces. macOS sees the device fine. It just refuses to give you a TTY.
The Gale’s debug interfaces are vendor-class (bInterfaceClass = 0xFF), not CDC-ACM. macOS only auto-binds /dev/cu.usbmodem* to CDC-ACM. On Linux you’d get /dev/ttyUSB0 because the kernel has a permissive fallback driver. On macOS you write libusb.
40 lines of pyusb, opened the AP interface, started reading bulk endpoints. First time I power-cycled the puck with the script running I got the entire vboot trace streaming:
coreboot-60d1b1c Mon Jan  9 00:04:49 UTC 2017 bootblock start
VbBootDeveloper() - trying fixed disk
VbTryLoadKernel() start, get_info_flags=0x2
MMC version  = 10000042
Man 000015 Snr 2789407485 Product 4FTE4R Revision 0.1
GptNextKernelEntry likes partition 2
Found kernel entry at 20480 size 32768
Checking key block signature...
In RSAVerify(): Padding check failed!
Verifying key block signature failed.
Checking key block hash only...
Kernel preamble is good.
In recovery mode or dev-signed kernel
TPM: Lock physical presence
Modified kernel command line: cros_secure console= loglevel=7
        init=/sbin/init ... root=PARTUUID=cc24514c-... dm_verity...
Loading FIT.
Config conf@7, kernel kernel@1, fdt fdt@7,
        compat google,gale-v2 (match) qcom,ipq4019
Choosing best match conf@7.
Exiting depthcharge with code 4 at timestamp: 42069715
Developer Console
...
enable_dev_usb_boot
Have fun and send patches!
The entire boot of an already-working puck. Coreboot bootblock, vboot trying to verify a kernel signature, failing because the OpenWrt kernel is dev-signed instead of factory-signed, falling back to hash-only verification, accepting it, handing off to the Marvell (er, Qualcomm IPQ4019 per depthcharge) SoC’s Linux. Even tells me at the end which command I’d want to run from a chronos shell to enable USB-boot of unsigned kernels.
Which is great if you can get to a chronos shell. Which on a walled puck, at this point, I could not.
the wall, in detail
Attached the SuzyQ to a walled puck instead of a working one. Same boot trace, almost. Different Product 4FPD3R for the eMMC. RSA signature verification PASSES outright this time. cmdline has dm_verity.dev_wait=1 and drm.trace=0x106. Different PARTUUID. The cmdline differences are visibly newer-firmware-than-the-puck-that-worked, which matched the community theory.
Then I tried the kkestell SW7 procedure with the puck on a hub instead of SuzyQ (the hub gives me the second USB port I need for the OpenWrt USB stick). Rapid blue, solid blue, purple loop, reboot. Just like the forum says.
But I now had serial on a parallel rig. So I could watch what was happening on the wire from a third terminal. Ran ping 192.168.1.1:
Request timeout for icmp_seq 33
Request timeout for icmp_seq 34
64 bytes from 192.168.1.1: icmp_seq=35 ttl=64 time=1.291 ms
64 bytes from 192.168.1.1: icmp_seq=36 ttl=64 time=0.750 ms
64 bytes from 192.168.1.1: icmp_seq=37 ttl=64 time=0.910 ms
64 bytes from 192.168.1.1: icmp_seq=38 ttl=64 time=1.036 ms
64 bytes from 192.168.1.1: icmp_seq=39 ttl=64 time=1.102 ms
64 bytes from 192.168.1.1: icmp_seq=40 ttl=64 time=0.955 ms
64 bytes from 192.168.1.1: icmp_seq=41 ttl=64 time=0.639 ms
Request timeout for icmp_seq 42
Request timeout for icmp_seq 43
Seven seconds of replies, then nothing, every three minutes. Kernel IS booting. LAN IS coming up. Networking works. Then the firmware kills it before SSH ever opens.
Just to be sure the puck wasn’t booting fully and I was unlucky on SSH timing, I race-looped ssh against ping for five minutes:
race start: Tue May 26 19:52:59 EDT 2026
[8 ping-OK windows across 5 minutes]
ssh: connect to host 192.168.1.1 port 22: Connection refused
ssh: connect to host 192.168.1.1 port 22: Connection refused
[...]
race end: Tue May 26 19:58:00 EDT 2026, 135 attempts, 0 SSH successes
Connection refused is the giveaway. Network stack is up, dropbear hasn’t bound port 22 yet. Per OpenWrt’s procd startup order, dropbear comes up after networking, and the firmware kills the kernel before procd reaches that step.
So yes, walled. Forum was right, my version was just more empirical. The question was whether I could do anything about it from a Mac with a $7 cable.
three rabbit holes claude and i went down
Sparing you most of the detail (it’s all in the repo at docs/ccd-unlock-research.md). The short version, ordered from “this would be great if it worked” to “okay, definitely not happening”:
Rabbit hole 1: the SPI bridge. Turns out the SuzyQ exposes a third USB interface (bInterfaceSubClass = 0x51, USB_SUBCLASS_GOOGLE_SPI) that’s literally a SPI flash programmer over USB. Same protocol flashrom’s raiden_debug_spi driver speaks. If I could enable it, I could dump the puck’s coreboot, patch out the signature check, write it back. No CH341A needed. Beautiful in theory. I sent a JEDEC ID read (opcode 0x9F) through the bridge and got back a defined error code: status=0x0005 = “The SPI bridge is disabled” per the chromiumos headers. Hardware wired up and working. Just turned off in software. On a Chromebook you’d flip it on with gsctool ccd-set FlashAP, except Gale doesn’t expose the USB_SUBCLASS_GOOGLE_UPDATE interface that gsctool talks to. Wedge identified, lock still in place.
Rabbit hole 2: vendor control transfers. Maybe a backdoor request that toggles the bridge. I wrote a fuzzer that swept all 256 bRequest values across four bmRequestType variants on both the device and each interface. 1024 control transfers, every single one returned STALL. Gale’s H1 firmware implements zero vendor-specific control handlers. The backdoor door isn’t locked, it just isn’t installed.
Rabbit hole 3: the GSC console. On a Chromebook you’d type ccd open at the GSC’s own console, which lives on yet another USB interface inside the same device. I checked Gale’s USB descriptor. bNumInterfaces = 3. The Cr50 GSC console would have been interface 2. Gale’s H1 has interfaces 0 (EC_PD), 1 (AP), and 3 (SPI). No interface 2. Not hidden, not locked, not there at all. Gale’s H1 ships a stripped-down Cr50 that drops the console interface.
At this point I stopped, wrote it all up, and pushed a commit titled “software path exhausted.” Told Claude the recipe was “find a screw, get a CH341A, hope for the best.” Claude agreed in detail.
Then, mostly out of curiosity, I asked Claude what a write-protect screw actually does.
the screw
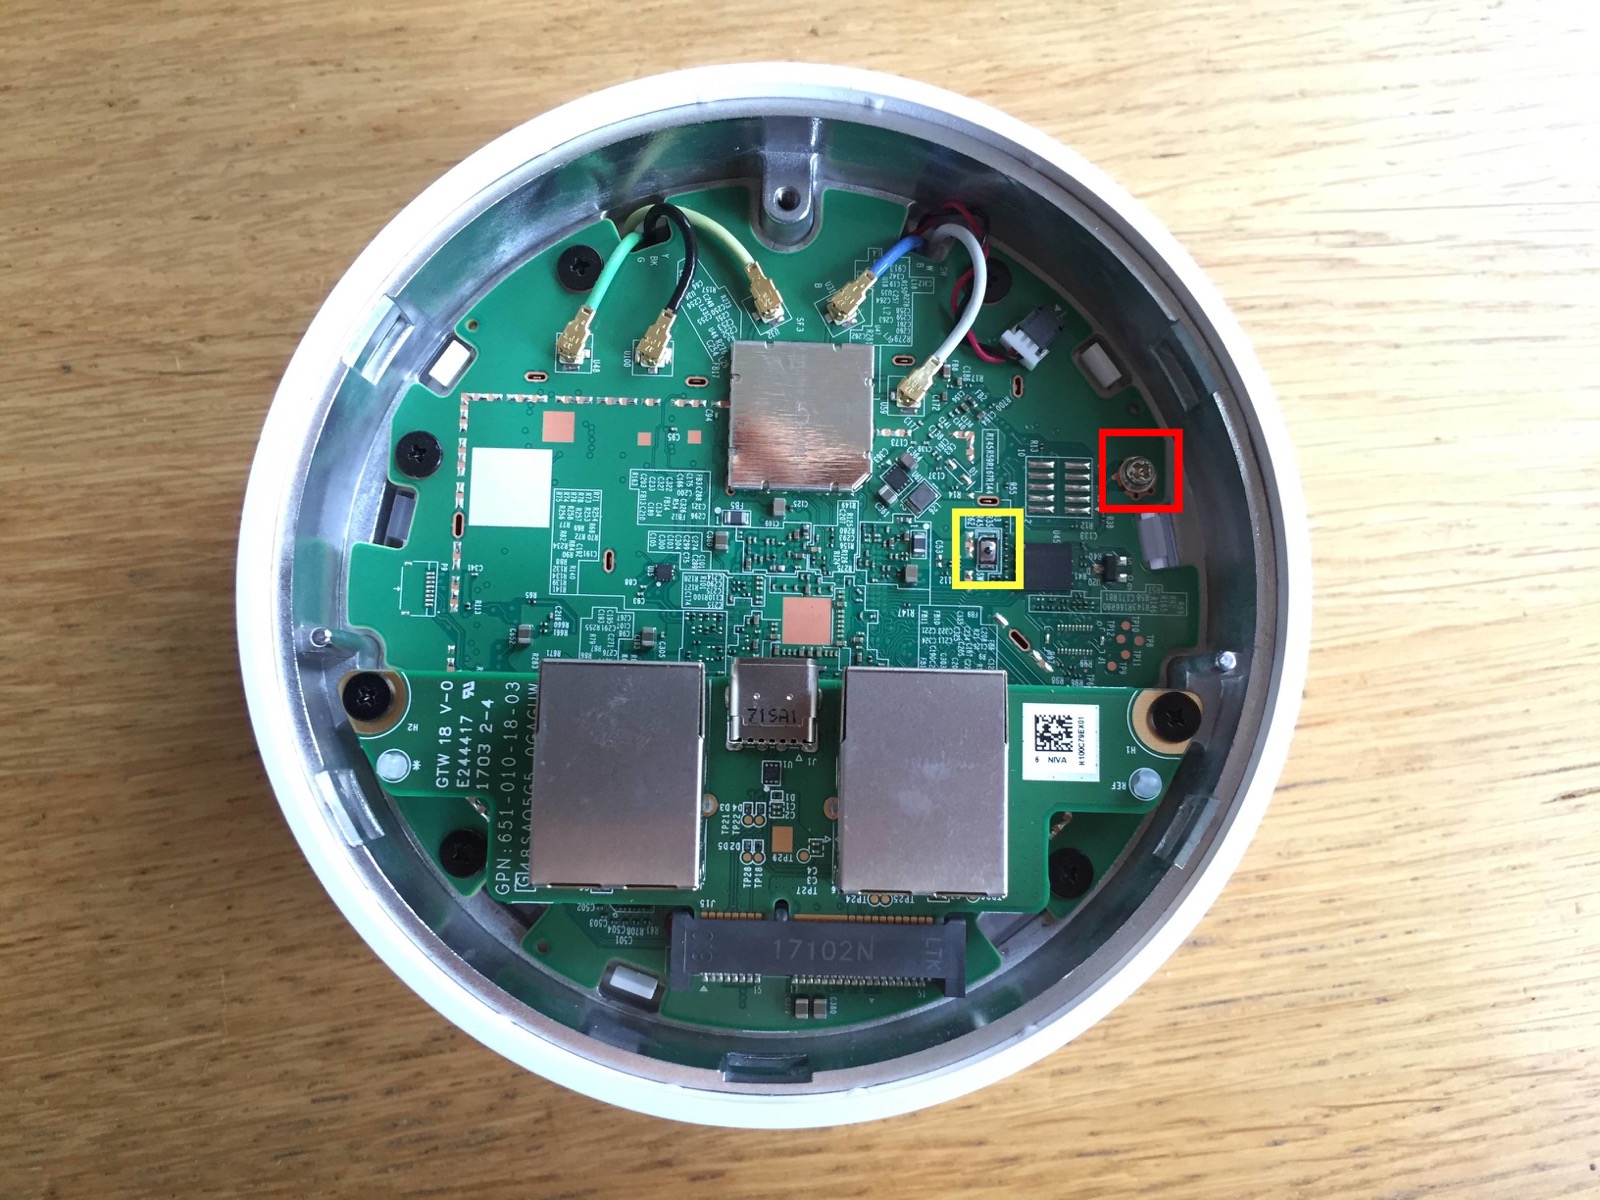 Gale PCB with the bottom plate off. Yellow box: SW7, the recovery switch you press during the boot dance. Red box: WP screw, the silver one with the conductive washer next to the H1. Image: OpenWrt wiki, CC BY-SA 4.0 — annotations by the wiki, not me.
Chromebooks have a hardware write-protect mechanism that ties the SPI flash chip’s WP# pin to a screw on the mainboard. Screw in plus its conductive washer bridging some pads means WP# is asserted means firmware writes blocked. Screw out means writes allowed. Claude was confident even with the screw out, the SuzyQ SPI bridge would still be locked by CCD, so removing the screw alone wouldn’t help. I’d still need the CH341A. Which is half right.
I opened a puck. Right next to the H1 chip there was a small silver screw with a brass washer that bridged at least three PCB pads. Different from the case screw. Not for clamping anything down; you could see the conductive contact under it. I’d been looking at the SoC and the SPI flash chip but hadn’t really registered this thing.
Channeled my former engadget self. Pulled it out, put it on a piece of tape, replugged the SuzyQ, re-ran the probe.
SPI bridge: still disabled. As Claude predicted.
For the hell of it, before giving up, I tested whether I could now write to the UART interfaces. Up till now every write to iface 0 (EC_PD) or iface 1 (AP) had returned Errno 60: Operation timed out. I’d been chalking that up to CCD locking those interfaces.
With the screw out:
iface 0 (EC_PD): WRITE OK
iface 1 (AP):    WRITE OK
Removing the screw didn’t unlock the SPI bridge but it did unlock CCD writes on the UART consoles. Which meant I could now type at the AP console. Which is connected to wherever a getty would be running, if a getty was running. Which on a Gale puck in dev mode, it is. Sent chronos\r:
chronos
No directory, logging in with HOME=/
chronos@localhost $
A shell. On a “walled” puck. The exact thing the Developer Console banner had been telling me about for days. I just hadn’t been able to type at it.
the command
The Developer Console banner tells you what to run if you want USB boot of unsigned kernels:
If you are having trouble booting a self-signed kernel, you may need to
enable USB booting.  To do so, run the following as root:

    enable_dev_usb_boot
I ran it:
chronos@localhost $ sudo enable_dev_usb_boot
We trust you have received the usual lecture from the local System
Administrator.

    SUCCESS: Booting any self-signed kernel from SSD/USB/SDCard slot is enabled.

    Insert bootable media into USB / SDCard slot and press Ctrl-U in developer
    screen to boot your self-signed image.
Then I went to flash. SW7 dance. Same rapid blue, same solid blue, same purple loop. Five-minute SSH race. Zero hits. Identical to before.
The command had lied. I went back to the chronos shell and ran crossystem. Every single flag that should have come from vboot NVRAM came back like this:
Flashrom invocation failed (exit status 127): flashrom -p host -r -i RW_NVRAM:/tmp/vb2_flashrom.Ae2oKY
backup_nvram_request    = (error)
[...]
Flashrom invocation failed (exit status 127): [...]
dev_boot_usb            = (error)
127 is “command not found.” The auto-updated firmware on this puck doesn’t ship the flashrom binary in PATH. crossystem shells out to flashrom to read and write the RW_NVRAM region of the SPI flash, and when flashrom isn’t there, crossystem silently reports (error) for every NVRAM-backed field. enable_dev_usb_boot ALSO shells out to crossystem under the hood, gets the same (error), and prints SUCCESS anyway. Lovely.
So the actual wall, the thing that had been making me think the firmware had a signature watchdog at the kernel-handoff layer, was a missing binary on the production image plus a script that doesn’t check its own return codes.
This is also why kkestell’s procedure works on never-online pucks. The original 2017 firmware shipped with flashrom in PATH. The auto-updated newer firmware dropped it, presumably because Google figured no consumer would ever need flashrom on their router. They were right about consumers, wrong about me.
the fix
Once you know flashrom is missing, the answer’s obvious. Reflash the original factory firmware. The version that has flashrom. Then run enable_dev_usb_boot from that.
Google publishes the official Gale recovery image at:
https://dl.google.com/dl/edgedl/chromeos/recovery/chromeos_9334.41.3_gale_recovery_stable-channel_mp.bin.zip
70 MB zip, 1.84 GB extracted, sha1 3914470f0f3417cbd876c238fe495d65562c4f6e. Same image OnHub Recovery Utility would download, except now you can just dd it. (I tried OnHub Recovery first. It refused to install on Chrome 131 with some opaque manifest error. The direct URL works.)
Full recipe:
- Open the case, find the WP screw, remove it. The washer is the giveaway, it bridges multiple pads.
- Write the Gale recovery image to a USB stick:
sudo dd if=chromeos_9334.41.3_gale_recovery_stable-channel_mp.bin of=/dev/rdisk4 bs=1m conv=sync. Theconv=syncmatters because the file isn’t a multiple of 512 bytes and rdisk on macOS rejects partial sector writes. - Plug the USB stick into a USB-C PD hub, plug the puck into the hub, hold the puck’s external reset button while connecting, release at amber LED, wait five minutes for solid blue. Fresh factory ChromeOS install with flashrom present.
- Unplug from the hub. Plug the SuzyQ between the puck and your Mac. Hold reset, plug SuzyQ, release at amber, press SW7, wait three seconds, press SW7 again. That puts the puck in recovery mode; the second SW7 press confirms “yes, enable dev mode”; the TPM stores the flag; the puck cold-reboots into dev mode.
- Wait three to five minutes. ChromeOS does a first-boot-in-dev-mode powerwash that recreates the stateful partition. The puck will cycle through the boot a few times in this period and the
localhost login:prompt will flash on the serial console for a second each cycle before disappearing. Resist the urge to type. If you typechronosduring this period, depthcharge interprets the keypresses as menu navigation and you’ll accidentally toggle dev mode back off and have to redo the SW7 dance. Ask me how I know. - Once
localhost login:sticks (stays on screen instead of flashing), sendchronos\rand you get a shell with no password. - Run:
sudo enable_dev_usb_boot
sudo crossystem dev_boot_usb=1 dev_boot_signed_only=0 dev_default_boot=usb
Confirm with
sudo crossystem dev_boot_usbreturning1. - Standard kkestell flow from here. Write OpenWrt’s
factory.binto the same USB stick, swap from SuzyQ back to the hub, SW7 dance, USB-boots OpenWrt steady-blue this time, no purple revert.scp -O factory.bin root@192.168.1.1:/tmp/,dd if=/dev/zero bs=512 seek=7634911 of=/dev/mmcblk0 count=33,dd if=/tmp/...factory.bin of=/dev/mmcblk0 && sync && reboot. Pull the USB stick, wait thirty seconds, boots OpenWrt from internal eMMC. Done.
Ten minutes per puck once you’ve done it once. Factory recovery is the slow step (five minutes). SW7 dance plus chronos login plus the four commands is maybe two minutes. Rest is cable swapping and waiting for the LED to settle. I flashed five walled pucks back-to-back this way and all worked first try.
what i tested to make sure no step was unnecessary
I was paranoid about publishing a procedure that’s a superset of what actually works. Claude was happily writing me long recipes that may or may not have included redundant steps. On the fourth puck I did A/B tests on the two steps that seemed most “maybe this is just superstition.”
Did I really need to remove the WP screw? Tried chronos login with the screw still installed. Both UART interfaces (EC_PD and AP) returned Errno 60: Operation timed out on every write attempt. Without the screw out you can’t type at the puck. So yes, the screw has to come out.
Did I really need to reflash factory firmware? Tried skipping that step on the same puck (WP screw out, SW7 dance to enable dev mode, straight to chronos login attempt). ChromeOS got stuck in the powerwash cycle, never stabilized at localhost login:. Waited 12 minutes; the login prompt flashed on screen during each boot cycle but Linux rebooted before chronos shell could finish setup. Hypothesis: the auto-updated image is missing not just flashrom but other components the powerwash flow needs. After running the factory recovery flash, powerwash completes in 3-5 minutes and chronos sticks.
Two confirmed-necessary steps, no shortcuts found. There may still be a shortcut for pucks that were never online (firmware never auto-updated, flashrom still present, you can skip the recovery flash). I don’t have an offline-since-2017 puck to test on. If you do, try the chronos shell on the original firmware after just removing the WP screw and the SW7 dance, before doing the recovery flash. Let me know.
things that surprised me
This was supposed to be a serial-console story. I bought the cable to watch the boot and figure out why my Mac wasn’t getting an ethernet link to a USB-booted OpenWrt puck. The walled-puck unlock was a side quest that ate the main quest.
The wall isn’t a firmware-policy wall, it’s a missing-binary wall, which is much dumber and much more fixable. The three rabbit holes all dead-ended at “this would be the right way to do this on a Chromebook, but Gale doesn’t expose the interface.” They weren’t wasted, exactly. They were just looking in the wrong drawer. And they were necessary to convince me the unlock had to be hardware-flavored, which is the only reason I bothered looking at the screw.
The HW write-protect screw doing double duty as a CCD-UART unlock was not in any documentation I could find. MrChromebox describes WP screw removal in the context of unbricking with a CH341A. The chromium hdctools docs mention CCD UART access as a capability you flip on with gsctool (which Gale doesn’t have). Nobody I read said “hey, on this device, the screw also unlocks the UART writes.” It’s possible this is well-known in the Chromebook hacking community and I just didn’t find the right thread. If you know more, I’d love to hear from you.
enable_dev_usb_boot printing SUCCESS while silently failing is a UX choice. I get why the script doesn’t want to scare you, but a non-zero exit code when the underlying crossystem call returned (error) would have saved me about two hours.
The rubberducking-with-an-AI thing works, but the actual skill isn’t “make it look.” Claude is happy to look. Claude is also happy to hallucinate a solution that keeps you happy, or to confidently give up so the conversation keeps moving. Both feel like progress. Both are wrong when there’s something on the other side of the wall.
What engineers with the gray hairs and the horror stories know, and what an AI doesn’t, is that the wall almost always has more behind it. The job is to trust that hunch and then make sure you’ve actually ruled out every unpursued avenue before you let “this is impossible” stand. Stay methodical, keep redirecting, exhaust the actual surface area. The AI is a great pair for that part: patient, fast, doesn’t get tired, doesn’t get embarrassed. But it’s not going to tell you when to keep looking. That part is still on you.
code and notes
Everything is at github.com/jconnolly/google-wifi-suzyq-console-macos:
tools/gale-sniff-allis the read-only serial sniffer with auto-reconnect across power cycles. The auto-reconnect matters because the SuzyQ also powers the puck so power-cycling drops the USB device.tools/gale-spi-probeandtools/gale-ctrl-fuzzare the diagnostic tools from rabbit holes 1 and 2. Neither is necessary for actual flashing; they’re there to document what doesn’t work.docs/unlock-walled-puck.mdis the recipe in tutorial form.docs/flashing.mdcovers the standard kkestell flow (what works on never-walled pucks) with notes on what the serial trace should look like at each step.captures/has full serial traces from the entire journey, walled and unwalled, organized per session. Theflash-session-20260526-1913/directory in particular shows the wall in action and the eventual unlock.
If you have walled Gale pucks and want to mesh them with OpenWrt, the recipe will probably just work. If you have older firmware pucks, none of this is needed and you can follow kkestell’s original guide. If you’re on Linux and /dev/ttyUSB* shows up the moment you plug the SuzyQ in, please send me a thank-you photo, I was very jealous.
sources i leaned on
- kkestell’s OpenWrt-on-Google-WiFi guide
- papdee’s original procedure on the OpenWrt forum
- chocolateloverraj’s eBay SuzyQ listing and gsc-debug-board on GitHub
- chromium hdctools CCD documentation
- MrChromebox unbricking with CH341A
- coreboot/chrome-ec
chip/stm32/usb_spi.hfor the raiden protocol details