<?xml version="1.0" encoding="utf-8"?><feed xmlns="http://www.w3.org/2005/Atom" ><generator uri="https://jekyllrb.com/" version="3.10.0">Jekyll</generator><link href="https://ollyconn.com/feed.xml" rel="self" type="application/atom+xml" /><link href="https://ollyconn.com/" rel="alternate" type="text/html" /><updated>2026-05-29T13:47:48+00:00</updated><id>https://ollyconn.com/feed.xml</id><title type="html">ollyconn</title><subtitle>Personal blog of John Connolly. Mostly software engineering, occasionally hardware hacking, with the dust blown off after a multi-year hiatus.
</subtitle><author><name>John Connolly</name><email>john@ollyconn.com</email></author><entry><title type="html">I spent a day trying to make a Pi 5 a local LLM appliance, then found a MacBook in a drawer</title><link href="https://ollyconn.com/2026/05/28/local-llm-pi5-vs-macbook/" rel="alternate" type="text/html" title="I spent a day trying to make a Pi 5 a local LLM appliance, then found a MacBook in a drawer" /><published>2026-05-28T16:00:00+00:00</published><updated>2026-05-28T16:00:00+00:00</updated><id>https://ollyconn.com/2026/05/28/local-llm-pi5-vs-macbook</id><content type="html" xml:base="https://ollyconn.com/2026/05/28/local-llm-pi5-vs-macbook/"><![CDATA[<p><em>I wanted a local LLM I could point Claude Code at over the LAN. The pitch on the Pi 5 16GB + AI HAT+ 2 (Hailo-10H NPU) was that quantized coding models would scream on a 40-TOPS NPU and sip 10 watts. I built three Pi-side stacks, hit four dead ends, and almost spent $200 on an SSD before the user said “there’s a MacBook downstairs.” The MacBook beat the Pi by 5x at a model twice as big, for $0.</em></p>

<h2 id="tldr">tl;dr</h2>

<p>If you have a spare Apple Silicon Mac on your LAN, <strong>use it. Skip the Pi for LLM.</strong> The Pi 5 is still a great Hailo / Whisper / vision experimentation box, just not an agent backend.</p>

<p>If the Pi 5 is all you have, <strong><code class="language-plaintext highlighter-rouge">qwen3:8b</code> on Ollama is the ceiling</strong>: ~2 tokens/sec decode, painful but functional, an estimated 30-40% on SWE-bench Verified. <strong>Drop to <code class="language-plaintext highlighter-rouge">qwen3:4b</code> if you’d rather wait less.</strong></p>

<p>If you have $1K to spend and want a one-box appliance, the Mac Mini M4 24GB BTO at $999 unlocks <strong>Qwen3.6-27B at 77.2% SWE-bench Verified</strong>, two points behind Claude Sonnet 4.6. Strix Halo Mini-ITX at $1499 unlocks Mistral Medium 3.5 (128B) at 77.6%.</p>

<p>Everything above 80% on the leaderboard (DeepSeek V4 Pro Max, GLM-5, Kimi K2.6, Opus 4.5+) needs $5K+ of hardware. Not a one-day build.</p>

<p>Repo with all of this, including benchmark runner and the launchd plists: <a href="https://github.com/jconnolly/local-llm-pi5">local-llm-pi5</a>.</p>

<h2 id="the-goal">the goal</h2>

<p>A LAN box Claude Code can talk to as its <code class="language-plaintext highlighter-rouge">ANTHROPIC_BASE_URL</code>. No data leaves the network, no per-token billing, always-on, can run while I sleep. The cloud Claude stays available for hard problems; the local LLM handles the routine. Memories and session transcripts live in <code class="language-plaintext highlighter-rouge">~/.claude/</code> on the laptop, the model is interchangeable.</p>

<h2 id="act-1--the-pi-5-dream">act 1 — the Pi 5 dream</h2>

<p>Starting state:</p>

<ul>
  <li>Raspberry Pi 5 16GB, Debian 13 trixie, kernel 6.12.75</li>
  <li>Raspberry Pi AI HAT+ 2 with the Hailo-10H NPU soldered on (40 TOPS, M.2 form factor)</li>
  <li>A spare 2023 MacBook Air M2 16GB sitting in a drawer that I did not know I had</li>
</ul>

<p>The Hailo HAT was the headline. 40 TOPS, dedicated NPU, “compiled HEFs run quantized LLMs at native speed.” This is what made me bite on the build in the first place.</p>

<h2 id="act-2--hailo-10h-ambition">act 2 — Hailo-10H ambition</h2>

<p>Spent fifteen minutes researching before installing anything. Three findings killed the plan:</p>

<p><strong>1. The largest LLM HEF for the Hailo-10H is 2B params.</strong> The <a href="https://github.com/hailo-ai/hailo_model_zoo_genai/blob/main/docs/MODELS.rst">Hailo Model Zoo GenAI v5.3.0 catalogue</a> ships exactly these:</p>

<table>
  <thead>
    <tr>
      <th>Model</th>
      <th>Params</th>
      <th>Quant</th>
      <th>Ctx</th>
      <th>Decode tok/s</th>
      <th>Tool use</th>
    </tr>
  </thead>
  <tbody>
    <tr>
      <td>Llama3.2-1B-Instruct</td>
      <td>1B</td>
      <td>A8W4</td>
      <td>2048</td>
      <td>9.89</td>
      <td>No</td>
    </tr>
    <tr>
      <td>Qwen2.5-Coder-1.5B-Instruct</td>
      <td>1.5B</td>
      <td>A8W4</td>
      <td>2048</td>
      <td>8.13</td>
      <td>No</td>
    </tr>
    <tr>
      <td><strong>Qwen2-1.5B-Function-Calling-v1</strong></td>
      <td><strong>1.5B</strong></td>
      <td><strong>A8W4</strong></td>
      <td><strong>2048</strong></td>
      <td><strong>6.69</strong></td>
      <td><strong>Yes</strong></td>
    </tr>
    <tr>
      <td>Qwen3:1.7B</td>
      <td>1.7B</td>
      <td>A8W4</td>
      <td>2048</td>
      <td>4.78</td>
      <td>No</td>
    </tr>
    <tr>
      <td>Qwen2-VL-2B / Qwen3-VL-2B</td>
      <td>2B</td>
      <td>A8W4</td>
      <td>2048</td>
      <td>~5-7</td>
      <td>No</td>
    </tr>
  </tbody>
</table>

<p>The <em>only</em> HEF with tool calling is a 1.5B fine-tune of Qwen2. Too small to drive an agent loop in any non-toy way.</p>

<p><strong>2. The Hailo runtime’s context window caps at 2048 tokens.</strong> Claude Code’s own <a href="https://docs.anthropic.com/en/docs/claude-code/overview">official guidance</a> recommends ≥64k. The CC system prompt plus tool definitions plus a single small file read already overflows 2k. You cannot meaningfully use a Hailo HEF as a CC backend; you’d be re-prompting the model with a sliding 2k window and watching it forget context every other tool call.</p>

<p><strong>3. The <code class="language-plaintext highlighter-rouge">hailo-ollama</code> shim 500s on <code class="language-plaintext highlighter-rouge">tools</code> payloads.</strong> Open <a href="https://community.hailo.ai/t/hailo-ollama-tools-support/18624">community thread from Feb 2026</a> — the shim that bridges Hailo’s runtime to Ollama’s API throws <code class="language-plaintext highlighter-rouge">TreeToObjectMapper::mapString(): Node is NOT a STRING</code> whenever the request contains a <code class="language-plaintext highlighter-rouge">tools</code> field. A community fork patches it; it is not upstream and won’t survive HailoRT 5.3 upgrades. So even the toy 1.5B function-calling model can’t get its tool calls to a real Claude Code session without you maintaining a fork.</p>

<p>I installed the Hailo stack anyway — <code class="language-plaintext highlighter-rouge">hailo-h10-all</code> from the Pi extranet repo, plus the <code class="language-plaintext highlighter-rouge">hailo-apps</code> git tree. It works fine for vision and Whisper. It is just not an agent backend in May 2026.</p>

<p><strong>Lesson 1.</strong> Don’t pick the impressive hardware. Pick the matching software stack. The Hailo-10H is genuinely good at compiled HEF models — it’s bad at agentic LLMs because the compiler, the runtime, and the bridging shim were not built for that workload.</p>

<h2 id="act-3--ollama-on-the-pi-5-cpu">act 3 — Ollama on the Pi 5 CPU</h2>

<p>Plan B. Ignore the HAT, run llama.cpp via Ollama on the Pi 5’s Cortex-A76 quad-core. The Pi is memory-bandwidth-bound for inference, but it works.</p>

<h3 id="memory-guardrails-first">memory guardrails first</h3>

<p>The Pi 5 has 16GB of RAM and a 2GB swap on the SD card. SD swap is roughly 10x slower than NVMe. If Ollama starts thrashing it, the Pi goes unresponsive worse than a Mac does — the kernel keeps answering ICMP (so your monitoring says “network is up”) but every userspace service blocks indefinitely on disk.</p>

<p>systemd cgroup hard cap, so the kernel kills the model <em>before</em> swap thrash starts:</p>

<div class="language-ini highlighter-rouge"><div class="highlight"><pre class="highlight"><code><span class="c"># /etc/systemd/system/ollama.service.d/override.conf
</span><span class="nn">[Service]</span>
<span class="py">Environment</span><span class="p">=</span><span class="s">"OLLAMA_HOST=0.0.0.0:11434"</span>
<span class="py">Environment</span><span class="p">=</span><span class="s">"OLLAMA_MAX_LOADED_MODELS=1"</span>
<span class="py">Environment</span><span class="p">=</span><span class="s">"OLLAMA_NUM_PARALLEL=1"</span>
<span class="py">Environment</span><span class="p">=</span><span class="s">"OLLAMA_KEEP_ALIVE=5m"</span>
<span class="py">Environment</span><span class="p">=</span><span class="s">"OLLAMA_CONTEXT_LENGTH=8192"</span>
<span class="py">MemoryHigh</span><span class="p">=</span><span class="s">11G</span>
<span class="py">MemoryMax</span><span class="p">=</span><span class="s">12G</span>
</code></pre></div></div>

<p><code class="language-plaintext highlighter-rouge">MemoryMax=12G</code> is the load-bearing line. The model has plenty of room; the OS has plenty of room; nothing ever sees the SD card under load.</p>

<h3 id="model-selection">model selection</h3>

<p>I burned a few hours on this. The interesting failure mode is not “too slow” — it’s “tool use silently broken in ways the model’s own metadata won’t tell you.”</p>

<p><strong>Attempt 1: <code class="language-plaintext highlighter-rouge">qwen3-coder:7b</code>.</strong> Does not exist on Ollama. Qwen3-Coder’s smallest published variant is the 30B-A3B MoE, too big for a Pi 5 16GB. I’d hallucinated the model name from training-data overlap with Qwen3 and Qwen2.5-Coder. Always check <code class="language-plaintext highlighter-rouge">ollama list</code> for the actual registry.</p>

<p><strong>Attempt 2: <code class="language-plaintext highlighter-rouge">qwen2.5-coder:7b</code>.</strong> Pulled, ran, decode 2.37 tok/s. Hit it with a <code class="language-plaintext highlighter-rouge">get_weather</code> tool call. Response:</p>

<div class="language-json highlighter-rouge"><div class="highlight"><pre class="highlight"><code><span class="nl">"content"</span><span class="p">:</span><span class="w"> </span><span class="p">[</span><span class="w">
  </span><span class="p">{</span><span class="nl">"type"</span><span class="p">:</span><span class="w"> </span><span class="s2">"text"</span><span class="p">,</span><span class="w">
   </span><span class="nl">"text"</span><span class="p">:</span><span class="w"> </span><span class="s2">"{</span><span class="se">\"</span><span class="s2">name</span><span class="se">\"</span><span class="s2">: </span><span class="se">\"</span><span class="s2">get_weather</span><span class="se">\"</span><span class="s2">, </span><span class="se">\"</span><span class="s2">arguments</span><span class="se">\"</span><span class="s2">: {</span><span class="se">\"</span><span class="s2">city</span><span class="se">\"</span><span class="s2">: </span><span class="se">\"</span><span class="s2">Paris</span><span class="se">\"</span><span class="s2">}}"</span><span class="p">}</span><span class="w">
</span><span class="p">]</span><span class="w">
</span></code></pre></div></div>

<p>Tool use is broken. The model emits bare JSON instead of the <code class="language-plaintext highlighter-rouge">&lt;tool_call&gt;</code> XML wrapper its own template expects. Ollama’s parser doesn’t find the tag, dumps the raw output into a <code class="language-plaintext highlighter-rouge">text</code> block. Claude Code can’t dispatch a tool call from a <code class="language-plaintext highlighter-rouge">text</code> block. The model’s <code class="language-plaintext highlighter-rouge">tools</code> capability advertises “yes,” its output disagrees.</p>

<p><strong>Attempt 3: <code class="language-plaintext highlighter-rouge">qwen3:4b</code>.</strong> Pulled, ran, decode 4.05 tok/s. Same test:</p>

<div class="language-json highlighter-rouge"><div class="highlight"><pre class="highlight"><code><span class="nl">"content"</span><span class="p">:</span><span class="w"> </span><span class="p">[</span><span class="w">
  </span><span class="p">{</span><span class="nl">"type"</span><span class="p">:</span><span class="w"> </span><span class="s2">"thinking"</span><span class="p">,</span><span class="w"> </span><span class="nl">"thinking"</span><span class="p">:</span><span class="w"> </span><span class="s2">"I should call the weather tool..."</span><span class="p">},</span><span class="w">
  </span><span class="p">{</span><span class="nl">"type"</span><span class="p">:</span><span class="w"> </span><span class="s2">"tool_use"</span><span class="p">,</span><span class="w"> </span><span class="nl">"id"</span><span class="p">:</span><span class="w"> </span><span class="s2">"call_cdcrb8sm"</span><span class="p">,</span><span class="w">
   </span><span class="nl">"name"</span><span class="p">:</span><span class="w"> </span><span class="s2">"get_weather"</span><span class="p">,</span><span class="w"> </span><span class="nl">"input"</span><span class="p">:</span><span class="w"> </span><span class="p">{</span><span class="nl">"city"</span><span class="p">:</span><span class="w"> </span><span class="s2">"Paris"</span><span class="p">}}</span><span class="w">
</span><span class="p">]</span><span class="err">,</span><span class="w">
</span><span class="nl">"stop_reason"</span><span class="p">:</span><span class="w"> </span><span class="s2">"tool_use"</span><span class="w">
</span></code></pre></div></div>

<p>Proper <code class="language-plaintext highlighter-rouge">tool_use</code> block. Proper <code class="language-plaintext highlighter-rouge">stop_reason</code>. Bonus <code class="language-plaintext highlighter-rouge">thinking</code> trace. Qwen3 was trained with native tool-call tokens; Ollama’s parser recognizes them. The model emits exactly what its template promises.</p>

<p><strong>Attempt 4: <code class="language-plaintext highlighter-rouge">qwen3:8b</code>.</strong> Pulled, ran, decode 1.92 tok/s warm. Tool use works. Realistic agent-loop math: 10 tool-calling steps × ~300 tokens per assistant message at 2 tok/s = roughly <strong>25 minutes per loop</strong>. Brutal for interactive use; OK for batch.</p>

<p><strong>Lesson 2.</strong> A model’s <code class="language-plaintext highlighter-rouge">tools</code> capability advertisement is a claim, not a contract. Test end-to-end with a real request. The lookup table that says “Qwen2.5-Coder supports tools” is technically true and operationally useless: the model produces output its own scaffolding can’t parse. Qwen3 was trained for agentic loops; Qwen2.5-Coder was trained for code completion that <em>happens to mention</em> tools. They are not interchangeable.</p>

<h3 id="the-io-stall">the I/O stall</h3>

<p>Mid-investigation I tried to pull <code class="language-plaintext highlighter-rouge">qwen2.5-coder:3b</code> and <code class="language-plaintext highlighter-rouge">qwen3:8b</code> in parallel to save wall-time. Pi pinged. Every TCP service — SSH, Ollama, HTTP — went dead for five minutes. The kernel stayed alive; userspace blocked on disk.</p>

<p>Root cause: parallel 8 GB SD-card writes saturated the I/O queue. The SD card was the real reliability ceiling, not RAM, not CPU. Recovery required opening a terminal on the Pi’s local GUI and <code class="language-plaintext highlighter-rouge">sudo systemctl restart ollama</code> once the queue drained.</p>

<p><strong>Lesson 3.</strong> On an SD-card-rooted Pi 5, sustained parallel writes can lock all userspace services for minutes while the queue drains. ICMP keeps responding, so your monitor says “up.” It is not up.</p>

<h2 id="act-4--buying-my-way-out-almost">act 4 — buying my way out (almost)</h2>

<p>The obvious fix is “move root to NVMe over USB3.” Looked at SSD prices. <strong>NAND has spiked.</strong> 1TB NVMe drives that were $50-70 in 2024 retail at $200+ in May 2026 — HBM and AI-accelerator demand crowding out consumer flash. Three-to-four-times normal.</p>

<p>The Pi 5’s USB3 is gen1, 5 Gbps nominal, roughly 500 MB/s real. Any Gen3 NVMe (3000+ MB/s) saturates this. Paying for Gen4 or Gen5 specs gets you nothing.</p>

<p>Cheaper-with-same-bottleneck options:</p>

<ul>
  <li>USB3 NVMe enclosure ($25) + 1TB NVMe ($200+) = $225+</li>
  <li>USB-SATA enclosure ($10) + Crucial MX500 1TB SATA ($70) = $80</li>
  <li>Crucial X9 Pro 1TB portable USB SSD = $80, no assembly</li>
</ul>

<p><strong>Lesson 4.</strong> Find the bottleneck first. Pi 5 USB3 caps at 500 MB/s. Any modern SSD is fine. Specifying past the bottleneck is just markup.</p>

<p>I was about to click buy on the X9 Pro when the user mentioned the MacBook.</p>

<h2 id="act-5--swe-bench-reality-check">act 5 — SWE-bench reality check</h2>

<p>Before pivoting, I wanted to be sure I knew what I was trading away. Pulled the live SWE-bench Verified leaderboard. Top of the chart, May 27 2026:</p>

<table>
  <thead>
    <tr>
      <th>Rank</th>
      <th>Model</th>
      <th>SWE-bench Verified</th>
      <th>Open weights?</th>
    </tr>
  </thead>
  <tbody>
    <tr>
      <td>1</td>
      <td>Claude Mythos Preview</td>
      <td>93.9%</td>
      <td>closed</td>
    </tr>
    <tr>
      <td>2</td>
      <td><strong>Claude Opus 4.7 Adaptive</strong></td>
      <td><strong>87.6%</strong></td>
      <td>closed</td>
    </tr>
    <tr>
      <td>3</td>
      <td>GPT-5.3 Codex</td>
      <td>85.0%</td>
      <td>closed</td>
    </tr>
    <tr>
      <td>4</td>
      <td>Claude Opus 4.5</td>
      <td>80.9%</td>
      <td>closed</td>
    </tr>
    <tr>
      <td>6</td>
      <td><strong>DeepSeek V4 Pro Max</strong></td>
      <td><strong>80.6%</strong></td>
      <td><strong>open</strong></td>
    </tr>
    <tr>
      <td>8</td>
      <td><strong>Kimi K2.6</strong></td>
      <td><strong>80.2%</strong></td>
      <td><strong>open</strong></td>
    </tr>
    <tr>
      <td>10</td>
      <td>Claude Sonnet 4.6</td>
      <td>79.6%</td>
      <td>closed</td>
    </tr>
  </tbody>
</table>

<p>The top three open models — DeepSeek V4 Pro Max (671B MoE), Kimi K2.6 (~1T MoE), GLM-5 (335B) — each need hundreds of gigs of RAM. Not a one-day appliance.</p>

<p>Filtered to “open + fits a $1K box”:</p>

<table>
  <thead>
    <tr>
      <th>Model</th>
      <th>SWE-bench Verified</th>
      <th>Params</th>
      <th>Q4 RAM</th>
    </tr>
  </thead>
  <tbody>
    <tr>
      <td><strong>Qwen3.6-27B</strong></td>
      <td><strong>77.2%</strong></td>
      <td>27B dense</td>
      <td>~18 GB</td>
    </tr>
    <tr>
      <td>Qwen3-Coder-30B-A3B (MoE)</td>
      <td>51.6%</td>
      <td>30B MoE</td>
      <td>~18 GB</td>
    </tr>
    <tr>
      <td>Qwen3:14B (general)</td>
      <td>~45% est</td>
      <td>14B dense</td>
      <td>~9 GB</td>
    </tr>
    <tr>
      <td>Qwen3:8B (general)</td>
      <td>~30-40% est</td>
      <td>8B dense</td>
      <td>~5 GB</td>
    </tr>
  </tbody>
</table>

<p>The local headline is <strong>Qwen3.6-27B at 77.2%</strong>, two points behind Claude Sonnet 4.6 (79.6%). Needs 24 GB unified RAM — Mac Mini M4 24GB BTO at $999.</p>

<p>Down at the 16GB tier, <strong><code class="language-plaintext highlighter-rouge">qwen3:14b</code> lands somewhere around 45%</strong> estimated. That’s a ~43-point drop versus Opus 4.7. Privacy and zero-quota are real; coding accuracy roughly halves.</p>

<h2 id="act-6--wait-i-have-a-macbook-downstairs">act 6 — “wait, I have a MacBook downstairs”</h2>

<p>After six hours of Pi optimization and a near-miss SSD purchase: “Maral”, a 2023 MacBook Air M2 15”, 16 GB RAM, sitting in a drawer.</p>

<p>Found it via Bonjour. Apple devices advertise <code class="language-plaintext highlighter-rouge">_rfb._tcp</code> (Screen Sharing) as a strong macOS signal:</p>

<div class="language-bash highlighter-rouge"><div class="highlight"><pre class="highlight"><code>dns-sd <span class="nt">-B</span> _rfb._tcp local.
<span class="c"># → "Maral" instance</span>
dns-sd <span class="nt">-G</span> v4 maral.local
<span class="c"># → 192.168.10.210</span>
</code></pre></div></div>

<p>(Different subnet from my dev Mac. The Google Wifi mesh bridged mDNS across subnets transparently.)</p>

<p>Headless Ollama install on macOS without Homebrew, no <code class="language-plaintext highlighter-rouge">.pkg</code>, no UI. The binary lives inside the official <code class="language-plaintext highlighter-rouge">.app</code> bundle:</p>

<div class="language-bash highlighter-rouge"><div class="highlight"><pre class="highlight"><code>curl <span class="nt">-L</span> <span class="nt">-o</span> /tmp/Ollama-darwin.zip https://ollama.com/download/Ollama-darwin.zip
unzip /tmp/Ollama-darwin.zip <span class="nt">-d</span> /tmp/ollama-extract
<span class="nb">cp</span> /tmp/ollama-extract/Ollama.app/Contents/Resources/ollama ~/bin/ollama
<span class="nb">chmod</span> +x ~/bin/ollama
</code></pre></div></div>

<p>launchd user agent to keep <code class="language-plaintext highlighter-rouge">ollama serve</code> running, bound to the LAN:</p>

<div class="language-xml highlighter-rouge"><div class="highlight"><pre class="highlight"><code><span class="nt">&lt;plist</span> <span class="na">version=</span><span class="s">"1.0"</span><span class="nt">&gt;&lt;dict&gt;</span>
  <span class="nt">&lt;key&gt;</span>Label<span class="nt">&lt;/key&gt;&lt;string&gt;</span>com.ollama.serve<span class="nt">&lt;/string&gt;</span>
  <span class="nt">&lt;key&gt;</span>ProgramArguments<span class="nt">&lt;/key&gt;</span>
  <span class="nt">&lt;array&gt;</span>
    <span class="nt">&lt;string&gt;</span>/Users/jconnolly/bin/ollama<span class="nt">&lt;/string&gt;</span>
    <span class="nt">&lt;string&gt;</span>serve<span class="nt">&lt;/string&gt;</span>
  <span class="nt">&lt;/array&gt;</span>
  <span class="nt">&lt;key&gt;</span>EnvironmentVariables<span class="nt">&lt;/key&gt;</span>
  <span class="nt">&lt;dict&gt;</span>
    <span class="nt">&lt;key&gt;</span>OLLAMA_HOST<span class="nt">&lt;/key&gt;&lt;string&gt;</span>0.0.0.0:11434<span class="nt">&lt;/string&gt;</span>
    <span class="nt">&lt;key&gt;</span>OLLAMA_KEEP_ALIVE<span class="nt">&lt;/key&gt;&lt;string&gt;</span>10m<span class="nt">&lt;/string&gt;</span>
    <span class="nt">&lt;key&gt;</span>OLLAMA_MAX_LOADED_MODELS<span class="nt">&lt;/key&gt;&lt;string&gt;</span>1<span class="nt">&lt;/string&gt;</span>
  <span class="nt">&lt;/dict&gt;</span>
  <span class="nt">&lt;key&gt;</span>RunAtLoad<span class="nt">&lt;/key&gt;&lt;true/&gt;</span>
  <span class="nt">&lt;key&gt;</span>KeepAlive<span class="nt">&lt;/key&gt;&lt;true/&gt;</span>
<span class="nt">&lt;/dict&gt;&lt;/plist&gt;</span>
</code></pre></div></div>

<p>Plus <code class="language-plaintext highlighter-rouge">caffeinate -dimsu</code> as a second user agent to keep the Mac awake while the lid is open. Full lid-closed sleep still needs <code class="language-plaintext highlighter-rouge">sudo pmset -a disablesleep 1</code>.</p>

<p>Sanity check from my dev Mac:</p>

<div class="language-plaintext highlighter-rouge"><div class="highlight"><pre class="highlight"><code>$ curl -s http://192.168.10.210:11434/api/version
{"version":"0.24.0"}
</code></pre></div></div>

<h2 id="act-7--the-actual-numbers">act 7 — the actual numbers</h2>

<p>Benchmarks, May 27 2026:</p>

<table>
  <thead>
    <tr>
      <th>Device</th>
      <th>Model</th>
      <th>Tool use</th>
      <th>Decode tok/s</th>
      <th>Prefill tok/s</th>
      <th>Est SWE-bench Verified</th>
    </tr>
  </thead>
  <tbody>
    <tr>
      <td>Pi 5 16GB CPU</td>
      <td>qwen2.5-coder:3b</td>
      <td><strong>broken</strong> (bare JSON)</td>
      <td>5.89</td>
      <td>10.25</td>
      <td>~25%</td>
    </tr>
    <tr>
      <td>Pi 5 16GB CPU</td>
      <td>qwen2.5-coder:7b</td>
      <td><strong>broken</strong> (bare JSON)</td>
      <td>2.37</td>
      <td>4.45</td>
      <td>~30%</td>
    </tr>
    <tr>
      <td>Pi 5 16GB CPU</td>
      <td>qwen3:4b</td>
      <td>works</td>
      <td>4.05</td>
      <td>7.81</td>
      <td>~25-30%</td>
    </tr>
    <tr>
      <td>Pi 5 16GB CPU</td>
      <td>qwen3:8b</td>
      <td>works</td>
      <td><strong>1.92</strong></td>
      <td>4.34</td>
      <td>~30-40%</td>
    </tr>
    <tr>
      <td>Pi 5 + Hailo-10H</td>
      <td>Qwen2-1.5B-FC</td>
      <td>broken shim</td>
      <td>~6.69</td>
      <td>n/a</td>
      <td>~10-15%</td>
    </tr>
    <tr>
      <td><strong>MacBook Air M2 16GB</strong></td>
      <td><strong>qwen3:14b</strong></td>
      <td><strong>works</strong></td>
      <td><strong>10.13</strong></td>
      <td><strong>64.19</strong></td>
      <td><strong>~40-50%</strong></td>
    </tr>
    <tr>
      <td>Mac Mini M4 24GB ($999, hypothetical)</td>
      <td>Qwen3.6-27B</td>
      <td>works</td>
      <td>~20-25</td>
      <td>~120</td>
      <td><strong>77.2%</strong></td>
    </tr>
    <tr>
      <td>Claude Sonnet 4.6 (cloud)</td>
      <td>n/a</td>
      <td>works</td>
      <td>~100 streaming</td>
      <td>n/a</td>
      <td>79.6%</td>
    </tr>
    <tr>
      <td>Claude Opus 4.7 (cloud, 1M ctx)</td>
      <td>n/a</td>
      <td>works</td>
      <td>~50 streaming</td>
      <td>n/a</td>
      <td><strong>87.6%</strong></td>
    </tr>
  </tbody>
</table>

<p>The MacBook Air wins by <strong>5.3x decode at a 2x bigger model</strong> versus the Pi 5’s <code class="language-plaintext highlighter-rouge">qwen3:8b</code> best. Prefill is ~15x faster, which matters more than decode for tool-use loops with long context.</p>

<p>Going local on existing hardware costs <strong>roughly 42 percentage points of SWE-bench</strong> versus Opus 4.7. Going local on $999 of new hardware (Mac Mini M4 + Qwen3.6-27B) costs roughly 10 points. Privacy and quota are real; coding accuracy roughly halves at the free tier, drops only ~10 points at the $999 tier.</p>

<h2 id="act-8--wiring-it-without-losing-the-cloud-escape-hatch">act 8 — wiring it without losing the cloud escape hatch</h2>

<p>The local LLM is the <em>default</em>. Cloud Claude stays available for the hard problems. The constraint:</p>

<blockquote>
  <p>“I want cloud Claude only if I specifically invoke it. I don’t want it for ‘complex task’ — I want my Ollama to do memories and manage multiple sessions etc.”</p>
</blockquote>

<p>The reflex design — silent fallback when Maral is down — is wrong. “Maral momentarily unreachable” silently spends cloud quota. Intent should be explicit.</p>

<p>What shipped:</p>

<div class="language-sh highlighter-rouge"><div class="highlight"><pre class="highlight"><code><span class="c"># ~/.zshrc</span>
<span class="nv">LOCAL_LLM_HOST</span><span class="o">=</span><span class="s2">"192.168.10.210:11434"</span>
<span class="nv">LOCAL_LLM_MODEL</span><span class="o">=</span><span class="s2">"qwen3:14b"</span>
<span class="nv">LOCAL_LLM_SMALL</span><span class="o">=</span><span class="s2">"qwen3:8b"</span>

claude<span class="o">()</span> <span class="o">{</span>
  <span class="k">if</span> <span class="o">[[</span> <span class="nt">-n</span> <span class="s2">"</span><span class="nv">$ANTHROPIC_FORCE_CLOUD</span><span class="s2">"</span> <span class="o">]]</span><span class="p">;</span> <span class="k">then
    </span><span class="nb">env</span> <span class="nt">-u</span> ANTHROPIC_BASE_URL <span class="nt">-u</span> ANTHROPIC_AUTH_TOKEN <span class="nt">-u</span> ANTHROPIC_API_KEY <span class="se">\</span>
        <span class="nt">-u</span> ANTHROPIC_MODEL <span class="nt">-u</span> ANTHROPIC_SMALL_FAST_MODEL <span class="nb">command </span>claude <span class="s2">"</span><span class="nv">$@</span><span class="s2">"</span>
    <span class="k">return</span> <span class="nv">$?</span>
  <span class="k">fi
  if</span> <span class="o">!</span> curl <span class="nt">-sf</span> <span class="nt">-m</span> 1 <span class="s2">"http://</span><span class="k">${</span><span class="nv">LOCAL_LLM_HOST</span><span class="k">}</span><span class="s2">/api/version"</span> <span class="o">&gt;</span>/dev/null 2&gt;&amp;1<span class="p">;</span> <span class="k">then
    </span><span class="nb">echo</span> <span class="s2">"[claude] ERROR: Maral unreachable. Fix Maral, or use 'claude-cloud'."</span> <span class="o">&gt;</span>&amp;2
    <span class="k">return </span>1
  <span class="k">fi
  </span><span class="nv">ANTHROPIC_BASE_URL</span><span class="o">=</span><span class="s2">"http://</span><span class="k">${</span><span class="nv">LOCAL_LLM_HOST</span><span class="k">}</span><span class="s2">"</span> <span class="se">\</span>
  <span class="nv">ANTHROPIC_AUTH_TOKEN</span><span class="o">=</span><span class="s2">"ollama"</span> <span class="se">\</span>
  <span class="nv">ANTHROPIC_API_KEY</span><span class="o">=</span><span class="s2">""</span> <span class="se">\</span>
  <span class="nv">ANTHROPIC_MODEL</span><span class="o">=</span><span class="s2">"</span><span class="k">${</span><span class="nv">LOCAL_LLM_MODEL</span><span class="k">}</span><span class="s2">"</span> <span class="se">\</span>
  <span class="nv">ANTHROPIC_SMALL_FAST_MODEL</span><span class="o">=</span><span class="s2">"</span><span class="k">${</span><span class="nv">LOCAL_LLM_SMALL</span><span class="k">}</span><span class="s2">"</span> <span class="se">\</span>
    <span class="nb">command </span>claude <span class="s2">"</span><span class="nv">$@</span><span class="s2">"</span>
<span class="o">}</span>
claude-cloud<span class="o">()</span> <span class="o">{</span> <span class="nv">ANTHROPIC_FORCE_CLOUD</span><span class="o">=</span>1 claude <span class="s2">"</span><span class="nv">$@</span><span class="s2">"</span><span class="p">;</span> <span class="o">}</span>
</code></pre></div></div>

<p><code class="language-plaintext highlighter-rouge">claude</code> is strict-local: Maral or error. <code class="language-plaintext highlighter-rouge">claude-cloud</code> is explicit cloud. No silent cloud spend.</p>

<p>The state that matters lives in <code class="language-plaintext highlighter-rouge">~/.claude/</code> on the laptop, not in the model:</p>

<table>
  <thead>
    <tr>
      <th>Directory</th>
      <th>What</th>
      <th>Survives backend switch?</th>
    </tr>
  </thead>
  <tbody>
    <tr>
      <td><code class="language-plaintext highlighter-rouge">~/.claude/memory/</code></td>
      <td>Auto-memory + index</td>
      <td>Yes</td>
    </tr>
    <tr>
      <td><code class="language-plaintext highlighter-rouge">~/.claude/projects/&lt;hash&gt;/messages/*.jsonl</code></td>
      <td>Per-project session transcripts</td>
      <td>Yes</td>
    </tr>
    <tr>
      <td><code class="language-plaintext highlighter-rouge">~/.claude/.credentials.json</code></td>
      <td>OAuth tokens</td>
      <td>Only used on the cloud path</td>
    </tr>
    <tr>
      <td><code class="language-plaintext highlighter-rouge">~/.claude/sessions/</code></td>
      <td>Active session state</td>
      <td>Yes</td>
    </tr>
    <tr>
      <td><code class="language-plaintext highlighter-rouge">~/.claude/plugins/</code></td>
      <td>Installed plugins/skills</td>
      <td>Yes</td>
    </tr>
  </tbody>
</table>

<p>Switching <code class="language-plaintext highlighter-rouge">claude</code> to Maral does not lose memories, transcripts, multi-project work, or skills. The model just answers the same conversation with worse reasoning. Auto-memory writes will be sloppier — that’s a downstream cost worth accepting for the privacy and zero-quota win.</p>

<p>In-flight sessions hot-swap via <code class="language-plaintext highlighter-rouge">/exit</code> → <code class="language-plaintext highlighter-rouge">exec zsh</code> → <code class="language-plaintext highlighter-rouge">claude --resume</code>. The transcript replays into qwen3:14b’s context; the session continues with the new backend’s reasoning from that turn forward.</p>

<p><strong>Lesson 5.</strong> Make cloud opt-in, not auto-fallback. Silent fallback hides intent and burns quota. An explicit <code class="language-plaintext highlighter-rouge">claude-cloud</code> command makes the choice visible every time.</p>

<p><strong>Lesson 6.</strong> Backend env vars are launch-time, not runtime. The on-disk transcript is the actual state; the model is interchangeable.</p>

<h2 id="what-the-trip-taught-me">what the trip taught me</h2>

<p>A few things I’d tell past-me at 9am:</p>

<ol>
  <li><strong>Don’t pick the hardware first.</strong> I bought the Hailo HAT because 40 TOPS sounded great. The constraint that mattered was 2k context and a broken Ollama shim — neither of which is in the marketing copy.</li>
  <li><strong>Tool-use claims lie.</strong> “Qwen2.5-Coder supports tools” is true in some narrow lookup-table sense and false for any Claude-Code-class agent. Always run the smoke test.</li>
  <li><strong>Specify <em>to</em> the bottleneck, not past it.</strong> Pi 5 USB3 caps at 500 MB/s. Don’t buy Gen5 NVMe to feed a Gen1 host.</li>
  <li><strong>The free hardware in your house probably beats the optimized hardware on your bench.</strong> A 2023 MacBook Air M2 16GB is a better local LLM appliance than a Pi 5 + 40-TOPS NPU + $200 NVMe upgrade. Cost: $0.</li>
  <li><strong>Explicit beats implicit when the implicit choice spends real money.</strong> <code class="language-plaintext highlighter-rouge">claude-cloud</code> is one keystroke longer than auto-fallback. The keystroke is worth it.</li>
</ol>

<p>The full notes, the launchd plists, the systemd guardrails, the benchmark runner, the tool-use smoke test, and the four-line zsh router all live in <a href="https://github.com/jconnolly/local-llm-pi5">local-llm-pi5</a>.</p>

<p><em>Companion post on the Maral side-of-things is queued. Next up: a longer look at what <code class="language-plaintext highlighter-rouge">qwen3:14b</code> actually fails at in a Claude Code loop.</em></p>]]></content><author><name>John Connolly</name><email>john@ollyconn.com</email></author><category term="ai" /><category term="llm" /><category term="llm" /><category term="ollama" /><category term="qwen3" /><category term="raspberry-pi" /><category term="hailo" /><category term="claude-code" /><category term="local-ai" /><category term="mcp" /><category term="swe-bench" /><summary type="html"><![CDATA[A real-time investigation log. Pi 5 16GB + Hailo-10H AI HAT+ vs. a 2023 MacBook Air M2 as Claude Code backends over the LAN. The MacBook wins by 5x on speed at a model twice as big, for $0. Notes on qwen3 vs qwen2.5-coder tool-use parsing, SD-card I/O stalls, NAND price spikes, and where the cloud frontier actually sits.]]></summary><media:thumbnail xmlns:media="http://search.yahoo.com/mrss/" url="https://ollyconn.com/assets/img/og/local-llm-pi5-vs-macbook.png" /><media:content medium="image" url="https://ollyconn.com/assets/img/og/local-llm-pi5-vs-macbook.png" xmlns:media="http://search.yahoo.com/mrss/" /></entry><entry><title type="html">unbricking six google wifi pucks for $7, by rubberducking claude past every wall</title><link href="https://ollyconn.com/2026/05/27/unbricking-six-google-wifi-pucks/" rel="alternate" type="text/html" title="unbricking six google wifi pucks for $7, by rubberducking claude past every wall" /><published>2026-05-27T17:00:00+00:00</published><updated>2026-05-27T17:00:00+00:00</updated><id>https://ollyconn.com/2026/05/27/unbricking-six-google-wifi-pucks</id><content type="html" xml:base="https://ollyconn.com/2026/05/27/unbricking-six-google-wifi-pucks/"><![CDATA[<p><em>I had six bricked Google WiFi pucks. Claude was sure five of them needed a $30 SPI programmer and an older coreboot that nobody publishes. I was poking around the open case looking for any other angle when, channeling my former <a href="https://www.engadget.com/">engadget</a>-reading <a href="https://x.com/thinkgeek/status/975914832737325061">i-void-warranties</a> self, I noticed a silver screw with a conductive washer next to the H1 chip. Pulled it. Told Claude. Turned out that was basically the whole game.</em></p>

<h2 id="tldr">tl;dr</h2>

<p>Six discontinued Google WiFi pucks (model AC-1304, codename Gale). I wanted to mesh them with OpenWrt. The first one flashed in twenty minutes following <a href="https://github.com/kkestell/openwrt-on-google-wifi">the standard kkestell guide</a>. The other five did the boot dance, briefly answered ping, then reverted to a purple LED loop. Forum consensus: they’re walled by a newer Google firmware that refuses unsigned USB boot. The accepted remedies were a CH341A SPI programmer plus an older coreboot image nobody publishes, or “buy more pucks.”</p>

<p>Both of those felt bad. So I rubberducked Claude for a while and bought a $7 cable. The actual fix turned out to be: open the case, pull out the write-protect screw that was already on the mainboard, log into the chronos shell over the puck’s debug UART, run <code class="language-plaintext highlighter-rouge">enable_dev_usb_boot</code>, and from there the normal kkestell flow works. The wall isn’t a signature-enforcement wall, it’s a “the auto-updated firmware doesn’t ship <code class="language-plaintext highlighter-rouge">flashrom</code> so the script that sets the unlock flag silently no-ops” wall. Dumb, fixable, took an afternoon to figure out per puck the first time and ten minutes per puck after.</p>

<p>Below is the actual journey, including three rabbit holes Claude and I went down before noticing the screw.</p>

<h2 id="the-setup">the setup</h2>

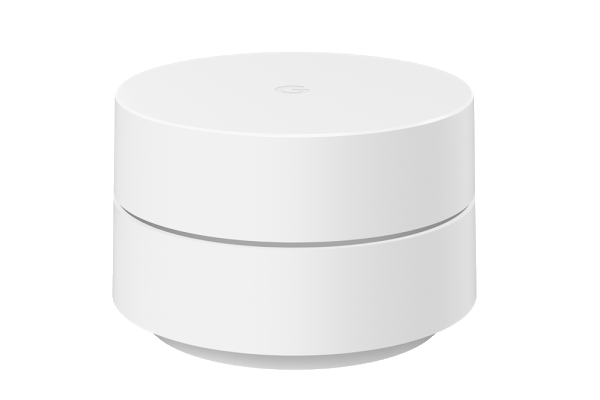
<p><img src="/assets/img/post-puck/google-wifi-product.png" alt="Google WiFi puck (AC-1304, codename Gale)" />
<em>The puck. Google WiFi AC-1304, codename Gale. Image: <a href="https://openwrt.org/toh/google/wifi">OpenWrt wiki</a>, CC BY-SA 4.0.</em></p>

<p>Verizon FiOS on Long Island, six pucks from the era when these were the cool mesh option. Google killed the Google WiFi app this year, the pucks are EOL, stock firmware works but has nothing I want (no SQM, no DNS-level adblock, no ssh). OpenWrt 25.12.4 has been a supported target for this hardware forever.</p>

<p>The published procedure (<a href="https://github.com/kkestell/openwrt-on-google-wifi">kkestell’s guide</a>, <a href="https://forum.openwrt.org/t/finally-installed-openwrt-on-my-google-wifi-ac-1304/183541">papdee’s OpenWrt forum thread</a>, <a href="https://openwrt.org/toh/google/wifi">the OpenWrt wiki page for Gale</a>) is simple:</p>

<ol>
  <li>Open the puck, find the internal switch called SW7.</li>
  <li>Boot a Chromium-OS-style USB drive containing the OpenWrt factory image.</li>
  <li>SSH into it at 192.168.1.1, dd that image onto the internal eMMC, reboot.</li>
</ol>

<p>I followed it on the puck that lives in my office. Worked first try. It now serves the house as <code class="language-plaintext highlighter-rouge">gw-main</code>, running <a href="https://www.bufferbloat.net/projects/codel/wiki/Cake/">cake SQM</a> at 285 down / 285 up against a baseline of 263ms bufferbloat. Felt great.</p>

<p>Tried the same procedure on every other puck. None of them worked. Every single one: hold reset, plug power, LED amber, release, press SW7, LED rapid-blue (depthcharge reading the USB stick), then solid blue (kernel loads), then twenty purple blinks, breathing purple, reboot, repeat.</p>

<p>I dug. Found <a href="https://forum.openwrt.org/t/finally-installed-openwrt-on-my-google-wifi-ac-1304/183541">the 2026-05-22 entry of the openwrt-on-google-wifi forum thread</a> where someone reports exactly this. The theory: pucks that were online for years auto-updated to a newer Google firmware with a stricter signature-enforcement step. Reflashing via Google’s “OnHub Recovery Utility” Chrome extension doesn’t help (the extension only ships the latest). <a href="https://github.com/marcosscriven/galeforce">Galeforce</a>, the rooted Google fork, gets reverted too. CH341A on the SPI chip would work in theory but needs an older Gale coreboot, which nobody has published.</p>

<p>Sat with that for a few days. Then I bought the cable.</p>

<h2 id="the-cable">the cable</h2>

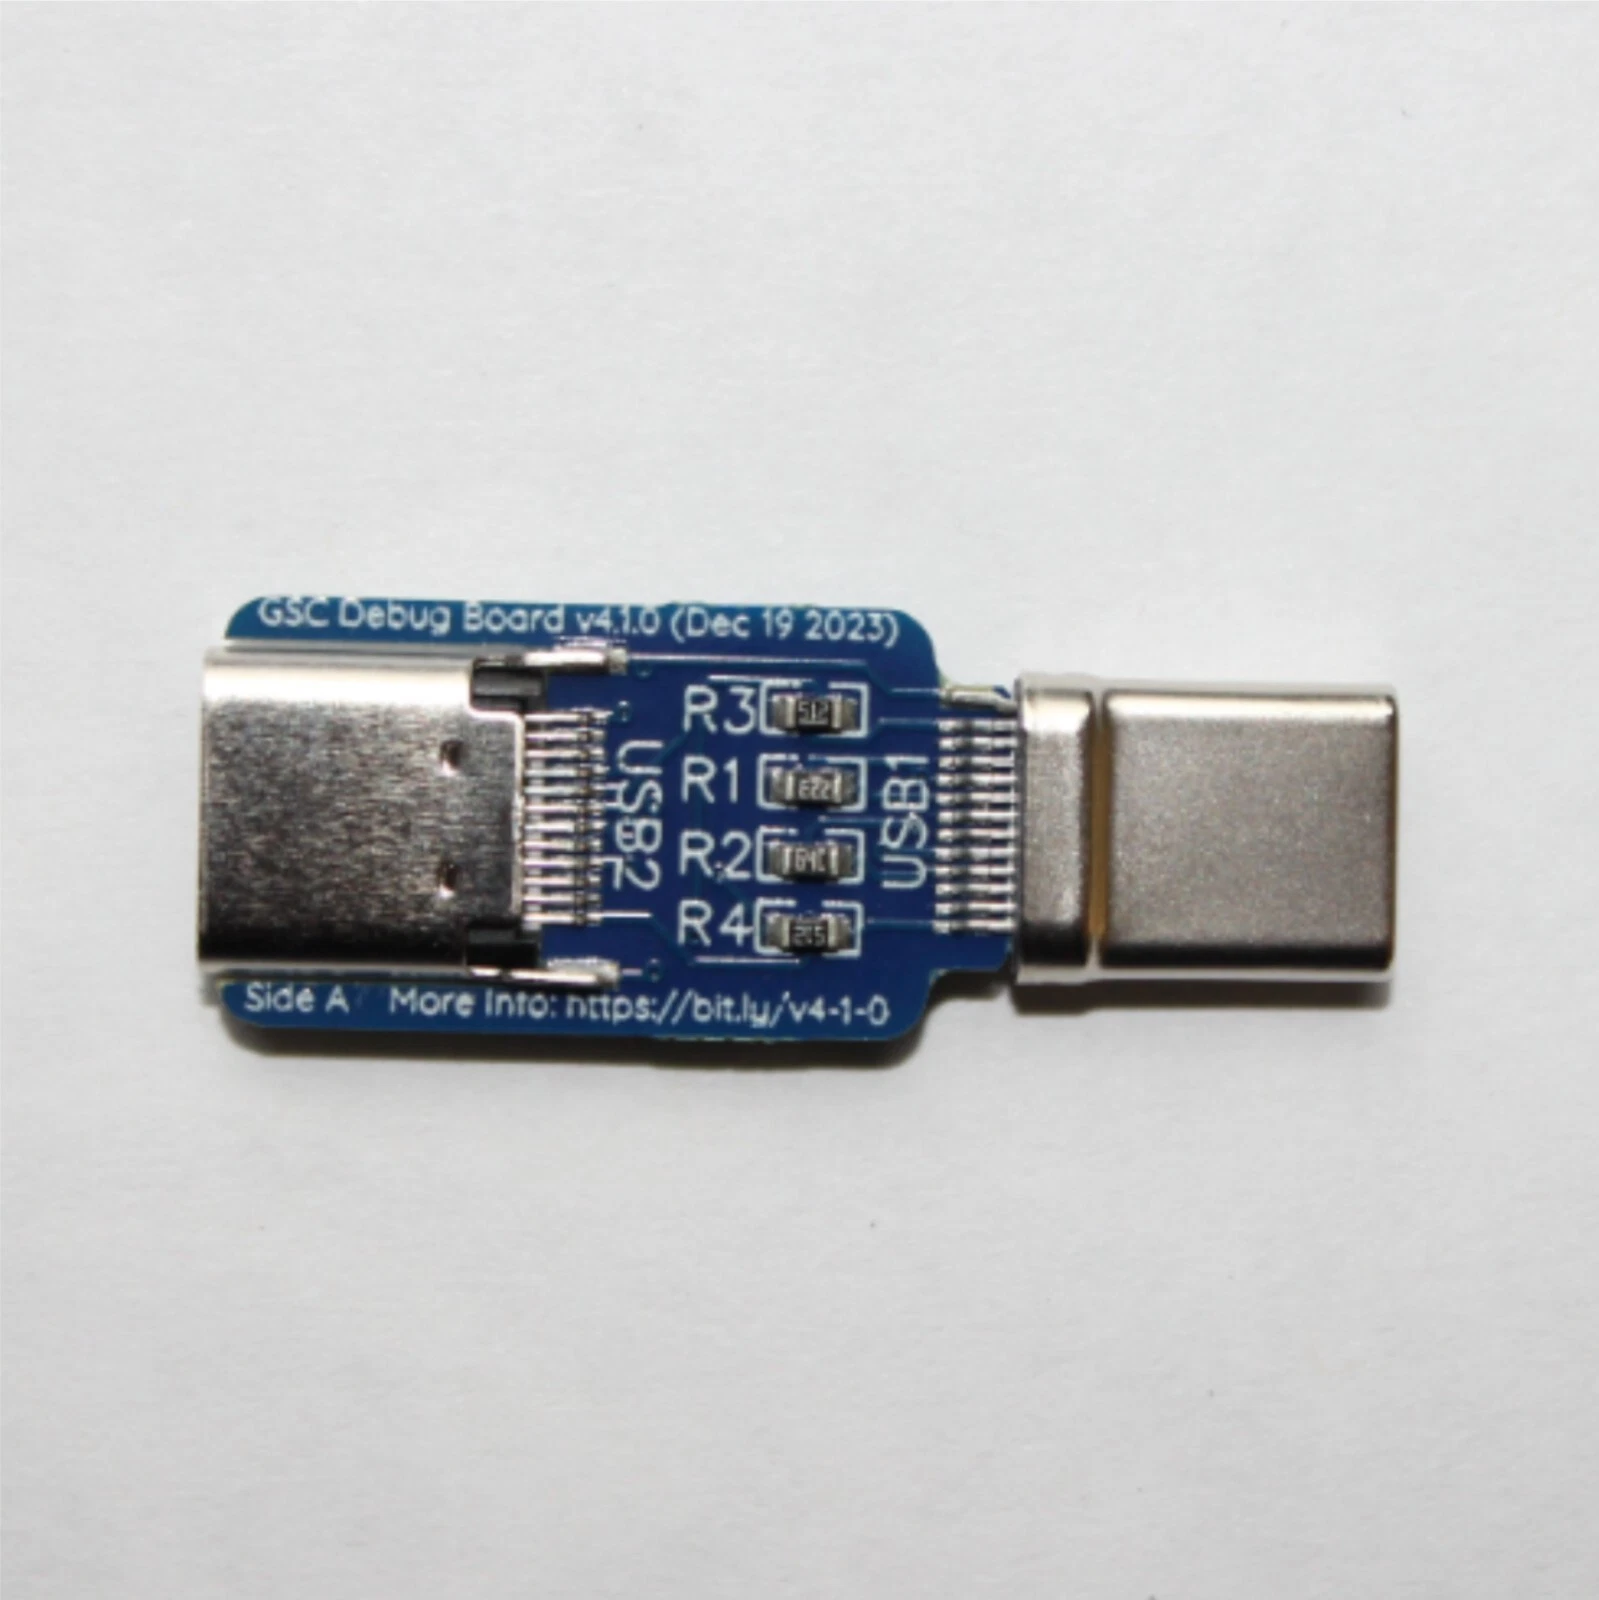
<p><a href="https://chromium.googlesource.com/chromiumos/third_party/hdctools/+/HEAD/docs/ccd.md">SuzyQ</a> (sometimes “SuzyQable”). Passive USB-A to USB-C adapter with very specific resistors on the CC lines. Plug the USB-C end into a compatible target’s USB-C port and the resistors flip it into “Debug Accessory Mode” so the target exposes itself as a USB device with bulk endpoints for the on-board debug consoles. Google uses the same trick on Chromebooks, so all the documentation is Chromebook-centric.</p>

<p>Bought one from <a href="https://www.ebay.com/itm/316024978790">a seller called <code class="language-plaintext highlighter-rouge">chocolateloverraj</code> on eBay</a>, $7.32 shipped. <a href="https://github.com/ChocolateLoverRaj/gsc-debug-board">Same person publishes the open hardware on GitHub</a>, 2,197 sold at the time I ordered. Shows up two days later in a tiny envelope. Something deeply satisfying about a piece of debug hardware that fits in your palm.</p>

<p><img src="/assets/img/post-puck/suzyq.webp" alt="ChocolateLoverRaj GSC Debug Board v4.1.0 — USB-C on the left (puck-side), USB-A on the right (Mac-side), four bias resistors on the CC lines in the middle." />
<em>The cable, “GSC Debug Board v4.1.0 (Dec 19 2023)”. USB-C left, USB-A right, the four resistors in the middle are what trick the puck into Debug Accessory Mode. Image: <a href="https://www.ebay.com/itm/316024978790">chocolateloverraj’s eBay listing</a>.</em></p>

<p>The puck has one USB-C port so the SuzyQ shares it with power. The cable provides 500 mA at 5V over the USB-A side and that’s enough to boot the puck on its own. Blue LED, no separate brick.</p>

<h2 id="macos-pretends-the-cable-doesnt-exist">macOS pretends the cable doesn’t exist</h2>

<p>Plug SuzyQ into a Mac. Plug the USB-C end into a Gale puck. Run <code class="language-plaintext highlighter-rouge">ls /dev/cu.*</code>. Nothing.</p>

<p>Run <code class="language-plaintext highlighter-rouge">ioreg -p IOUSB -l -w 0 | grep "Gale debug"</code> and there it is: <code class="language-plaintext highlighter-rouge">Google Inc. (0x18d1) / "Gale debug" (0x500f)</code> with three USB interfaces. macOS sees the device fine. It just refuses to give you a TTY.</p>

<p>The Gale’s debug interfaces are vendor-class (<code class="language-plaintext highlighter-rouge">bInterfaceClass = 0xFF</code>), not CDC-ACM. macOS only auto-binds <code class="language-plaintext highlighter-rouge">/dev/cu.usbmodem*</code> to CDC-ACM. On Linux you’d get <code class="language-plaintext highlighter-rouge">/dev/ttyUSB0</code> because the kernel has a permissive fallback driver. On macOS you write libusb.</p>

<p>40 lines of pyusb, opened the AP interface, started reading bulk endpoints. First time I power-cycled the puck with the script running I got the entire vboot trace streaming:</p>

<div class="language-plaintext highlighter-rouge"><div class="highlight"><pre class="highlight"><code>coreboot-60d1b1c Mon Jan  9 00:04:49 UTC 2017 bootblock start
VbBootDeveloper() - trying fixed disk
VbTryLoadKernel() start, get_info_flags=0x2
MMC version  = 10000042
Man 000015 Snr 2789407485 Product 4FTE4R Revision 0.1
GptNextKernelEntry likes partition 2
Found kernel entry at 20480 size 32768
Checking key block signature...
In RSAVerify(): Padding check failed!
Verifying key block signature failed.
Checking key block hash only...
Kernel preamble is good.
In recovery mode or dev-signed kernel
TPM: Lock physical presence
Modified kernel command line: cros_secure console= loglevel=7
        init=/sbin/init ... root=PARTUUID=cc24514c-... dm_verity...
Loading FIT.
Config conf@7, kernel kernel@1, fdt fdt@7,
        compat google,gale-v2 (match) qcom,ipq4019
Choosing best match conf@7.
Exiting depthcharge with code 4 at timestamp: 42069715
Developer Console
...
enable_dev_usb_boot
Have fun and send patches!
</code></pre></div></div>

<p>The entire boot of an already-working puck. <a href="https://www.coreboot.org/">Coreboot</a> bootblock, <a href="https://chromium.googlesource.com/chromiumos/platform/vboot_reference/">vboot</a> trying to verify a kernel signature, failing because the OpenWrt kernel is dev-signed instead of factory-signed, falling back to hash-only verification, accepting it, handing off to the Marvell (er, <a href="https://openwrt.org/docs/techref/hardware/soc/soc.qualcomm.ipq40xx">Qualcomm IPQ4019</a> per <a href="https://chromium.googlesource.com/chromiumos/platform/depthcharge/">depthcharge</a>) SoC’s Linux. Even tells me at the end which command I’d want to run from a chronos shell to enable USB-boot of unsigned kernels.</p>

<p>Which is great if you can get to a chronos shell. Which on a walled puck, at this point, I could not.</p>

<h2 id="the-wall-in-detail">the wall, in detail</h2>

<p>Attached the SuzyQ to a walled puck instead of a working one. Same boot trace, almost. Different <code class="language-plaintext highlighter-rouge">Product 4FPD3R</code> for the eMMC. RSA signature verification PASSES outright this time. cmdline has <code class="language-plaintext highlighter-rouge">dm_verity.dev_wait=1</code> and <code class="language-plaintext highlighter-rouge">drm.trace=0x106</code>. Different PARTUUID. The cmdline differences are visibly newer-firmware-than-the-puck-that-worked, which matched the community theory.</p>

<p>Then I tried the kkestell SW7 procedure with the puck on a hub instead of SuzyQ (the hub gives me the second USB port I need for the OpenWrt USB stick). Rapid blue, solid blue, purple loop, reboot. Just like the forum says.</p>

<p>But I now had serial on a parallel rig. So I could watch what was happening on the wire from a third terminal. Ran <code class="language-plaintext highlighter-rouge">ping 192.168.1.1</code>:</p>

<div class="language-plaintext highlighter-rouge"><div class="highlight"><pre class="highlight"><code>Request timeout for icmp_seq 33
Request timeout for icmp_seq 34
64 bytes from 192.168.1.1: icmp_seq=35 ttl=64 time=1.291 ms
64 bytes from 192.168.1.1: icmp_seq=36 ttl=64 time=0.750 ms
64 bytes from 192.168.1.1: icmp_seq=37 ttl=64 time=0.910 ms
64 bytes from 192.168.1.1: icmp_seq=38 ttl=64 time=1.036 ms
64 bytes from 192.168.1.1: icmp_seq=39 ttl=64 time=1.102 ms
64 bytes from 192.168.1.1: icmp_seq=40 ttl=64 time=0.955 ms
64 bytes from 192.168.1.1: icmp_seq=41 ttl=64 time=0.639 ms
Request timeout for icmp_seq 42
Request timeout for icmp_seq 43
</code></pre></div></div>

<p>Seven seconds of replies, then nothing, every three minutes. Kernel IS booting. LAN IS coming up. Networking works. Then the firmware kills it before SSH ever opens.</p>

<p>Just to be sure the puck wasn’t booting fully and I was unlucky on SSH timing, I race-looped ssh against ping for five minutes:</p>

<div class="language-plaintext highlighter-rouge"><div class="highlight"><pre class="highlight"><code>race start: Tue May 26 19:52:59 EDT 2026
[8 ping-OK windows across 5 minutes]
ssh: connect to host 192.168.1.1 port 22: Connection refused
[...]
race end: Tue May 26 19:58:00 EDT 2026, 135 attempts, 0 SSH successes
</code></pre></div></div>

<p><code class="language-plaintext highlighter-rouge">Connection refused</code> is the giveaway. Network stack is up, dropbear hasn’t bound port 22 yet. Per <a href="https://openwrt.org/docs/techref/procd">OpenWrt’s procd startup order</a>, dropbear comes up after networking, and the firmware kills the kernel before procd reaches that step.</p>

<p>So yes, walled. Forum was right, my version was just more empirical. The question was whether I could do anything about it from a Mac with a $7 cable.</p>

<h2 id="three-rabbit-holes-claude-and-i-went-down">three rabbit holes claude and i went down</h2>

<p>Sparing you most of the detail (it’s all in the repo at <code class="language-plaintext highlighter-rouge">docs/ccd-unlock-research.md</code>). The short version, ordered from “this would be great if it worked” to “okay, definitely not happening”:</p>

<p><strong>Rabbit hole 1: the SPI bridge.</strong> Turns out the SuzyQ exposes a third USB interface (<code class="language-plaintext highlighter-rouge">bInterfaceSubClass = 0x51</code>, <code class="language-plaintext highlighter-rouge">USB_SUBCLASS_GOOGLE_SPI</code>) that’s literally a SPI flash programmer over USB. Same protocol <a href="https://www.flashrom.org/">flashrom</a>’s <a href="https://review.coreboot.org/plugins/gitiles/flashrom/+/refs/heads/main/raiden_debug_spi.c"><code class="language-plaintext highlighter-rouge">raiden_debug_spi</code> driver</a> speaks. If I could enable it, I could dump the puck’s coreboot, patch out the signature check, write it back. No CH341A needed. Beautiful in theory. I sent a JEDEC ID read (opcode <code class="language-plaintext highlighter-rouge">0x9F</code>) through the bridge and got back a defined error code: <code class="language-plaintext highlighter-rouge">status=0x0005</code> = “The SPI bridge is disabled” per the chromiumos headers. Hardware wired up and working. Just turned off in software. On a Chromebook you’d flip it on with <a href="https://chromium.googlesource.com/chromiumos/platform/ec/+/HEAD/extra/usb_updater/gsctool.c"><code class="language-plaintext highlighter-rouge">gsctool ccd-set FlashAP</code></a>, except Gale doesn’t expose the <code class="language-plaintext highlighter-rouge">USB_SUBCLASS_GOOGLE_UPDATE</code> interface that gsctool talks to. Wedge identified, lock still in place.</p>

<p><strong>Rabbit hole 2: vendor control transfers.</strong> Maybe a backdoor request that toggles the bridge. I wrote a fuzzer that swept all 256 bRequest values across four bmRequestType variants on both the device and each interface. 1024 control transfers, every single one returned STALL. Gale’s H1 firmware implements zero vendor-specific control handlers. The backdoor door isn’t locked, it just isn’t installed.</p>

<p><strong>Rabbit hole 3: the GSC console.</strong> On a Chromebook you’d type <code class="language-plaintext highlighter-rouge">ccd open</code> at the GSC’s own console, which lives on yet another USB interface inside the same device. I checked Gale’s USB descriptor. <code class="language-plaintext highlighter-rouge">bNumInterfaces = 3</code>. The <a href="https://chromium.googlesource.com/chromiumos/platform/ec/+/HEAD/board/cr50/">Cr50</a> GSC console would have been interface 2. Gale’s H1 has interfaces 0 (EC_PD), 1 (AP), and 3 (SPI). No interface 2. Not hidden, not locked, not there at all. Gale’s H1 ships a stripped-down Cr50 that drops the console interface.</p>

<p>At this point I stopped, wrote it all up, and pushed a commit titled “software path exhausted.” Told Claude the recipe was “find a screw, get a CH341A, hope for the best.” Claude agreed in detail.</p>

<p>Then, mostly out of curiosity, I asked Claude what a write-protect screw actually does.</p>

<h2 id="the-screw">the screw</h2>

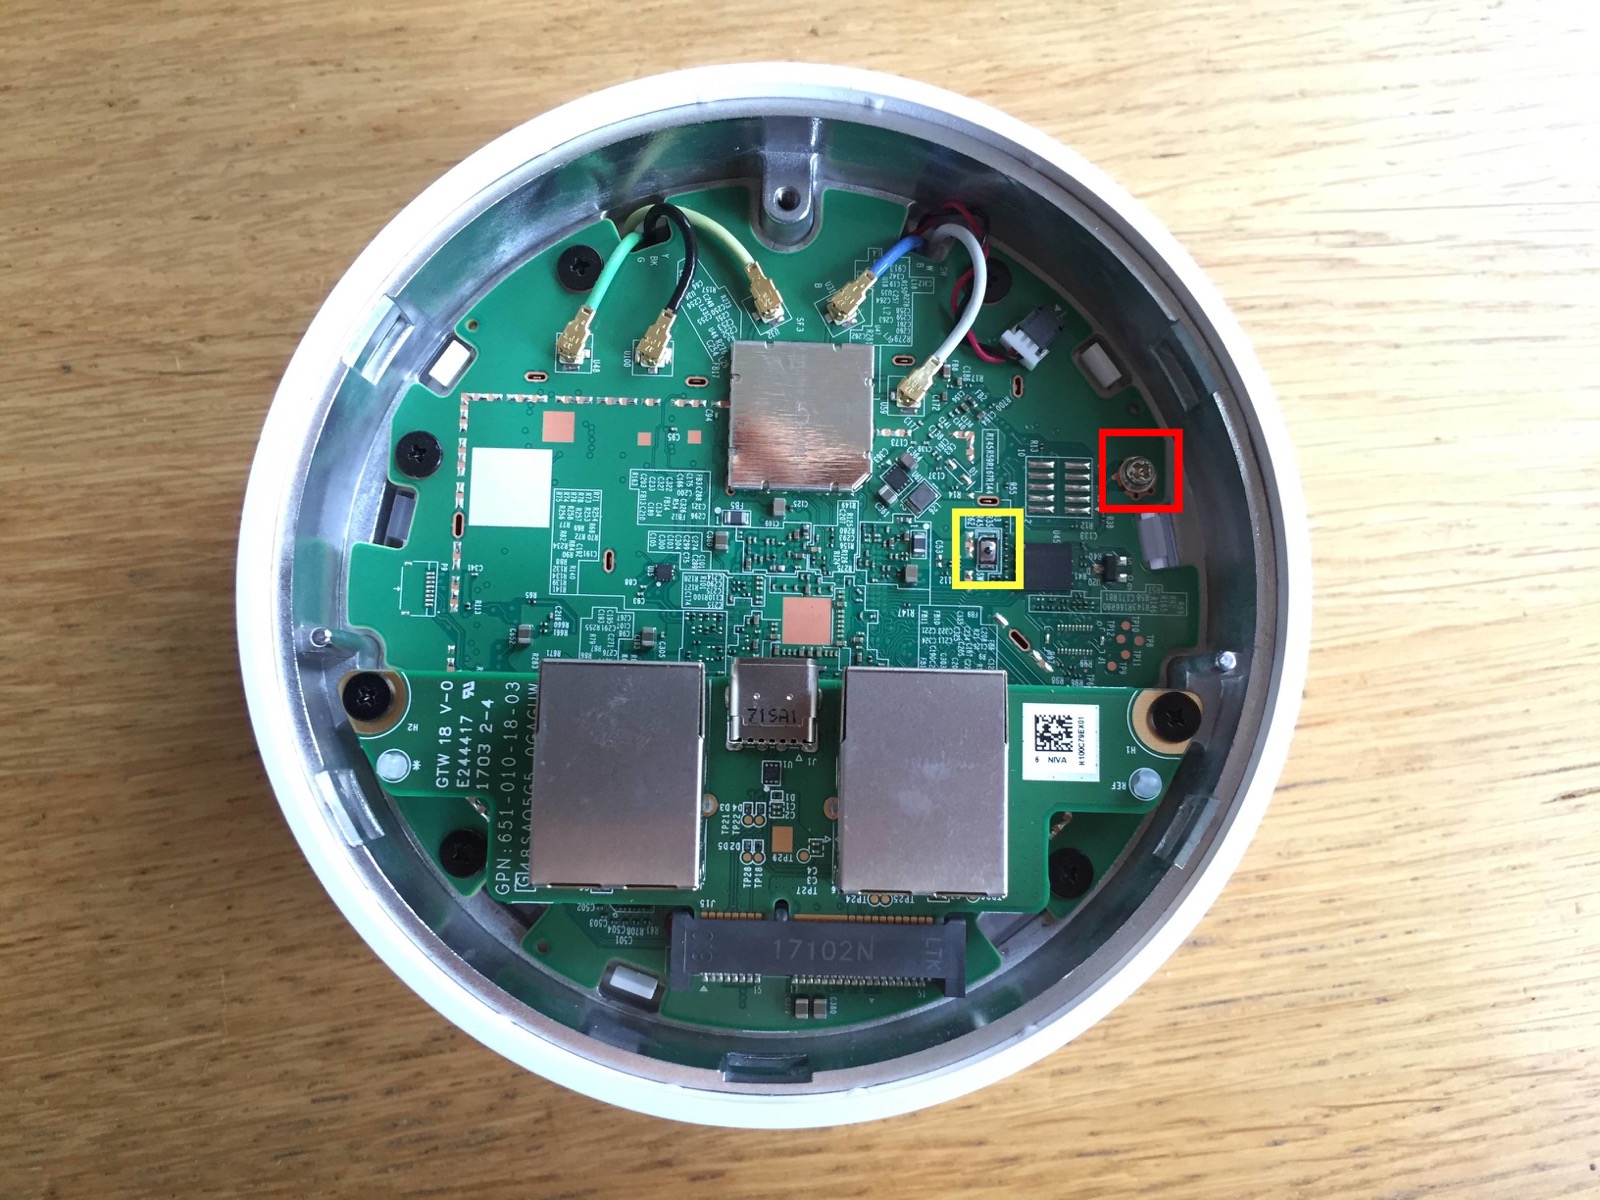
<p><img src="/assets/img/post-puck/google-wifi-pcb.jpg" alt="Google WiFi Gale PCB. Yellow box: SW7 recovery switch. Red box: WP screw with conductive washer next to the H1 chip." />
<em>Gale PCB with the bottom plate off. <strong>Yellow box: SW7</strong>, the recovery switch you press during the boot dance. <strong>Red box: WP screw</strong>, the silver one with the conductive washer next to the H1. Image: <a href="https://openwrt.org/toh/google/wifi">OpenWrt wiki</a>, CC BY-SA 4.0 — annotations by the wiki, not me.</em></p>

<p>Chromebooks have <a href="https://chromium.googlesource.com/chromiumos/docs/+/HEAD/write_protection.md">a hardware write-protect mechanism</a> that ties the SPI flash chip’s WP# pin to a screw on the mainboard. Screw in plus its conductive washer bridging some pads means WP# is asserted means firmware writes blocked. Screw out means writes allowed. Claude was confident even with the screw out, the SuzyQ SPI bridge would still be locked by CCD, so removing the screw alone wouldn’t help. I’d still need the CH341A. Which is half right.</p>

<p>I opened a puck. Right next to the H1 chip there was a small silver screw with a brass washer that bridged at least three PCB pads. Different from the case screw. Not for clamping anything down; you could see the conductive contact under it. I’d been looking at the SoC and the SPI flash chip but hadn’t really registered this thing.</p>

<p>Channeled my former engadget self. Pulled it out, put it on a piece of tape, replugged the SuzyQ, re-ran the probe.</p>

<p>SPI bridge: still disabled. As Claude predicted.</p>

<p>For the hell of it, before giving up, I tested whether I could now write to the UART interfaces. Up till now every write to iface 0 (EC_PD) or iface 1 (AP) had returned <code class="language-plaintext highlighter-rouge">Errno 60: Operation timed out</code>. I’d been chalking that up to CCD locking those interfaces.</p>

<p>With the screw out:</p>

<div class="language-plaintext highlighter-rouge"><div class="highlight"><pre class="highlight"><code>iface 0 (EC_PD): WRITE OK
iface 1 (AP):    WRITE OK
</code></pre></div></div>

<p>Removing the screw didn’t unlock the SPI bridge but it did unlock CCD writes on the UART consoles. Which meant I could now type at the AP console. Which is connected to wherever a getty would be running, if a getty was running. Which on a Gale puck in dev mode, it is. Sent <code class="language-plaintext highlighter-rouge">chronos\r</code>:</p>

<div class="language-plaintext highlighter-rouge"><div class="highlight"><pre class="highlight"><code>chronos
No directory, logging in with HOME=/
chronos@localhost $
</code></pre></div></div>

<p>A shell. On a “walled” puck. The exact thing the Developer Console banner had been telling me about for days. I just hadn’t been able to type at it.</p>

<h2 id="the-command">the command</h2>

<p>The Developer Console banner tells you what to run if you want USB boot of unsigned kernels:</p>

<div class="language-plaintext highlighter-rouge"><div class="highlight"><pre class="highlight"><code>If you are having trouble booting a self-signed kernel, you may need to
enable USB booting.  To do so, run the following as root:

    enable_dev_usb_boot
</code></pre></div></div>

<p>I ran it:</p>

<div class="language-plaintext highlighter-rouge"><div class="highlight"><pre class="highlight"><code>chronos@localhost $ sudo enable_dev_usb_boot
We trust you have received the usual lecture from the local System
Administrator.

    SUCCESS: Booting any self-signed kernel from SSD/USB/SDCard slot is enabled.

    Insert bootable media into USB / SDCard slot and press Ctrl-U in developer
    screen to boot your self-signed image.
</code></pre></div></div>

<p>Then I went to flash. SW7 dance. Same rapid blue, same solid blue, same purple loop. Five-minute SSH race. Zero hits. Identical to before.</p>

<p>The command had lied. I went back to the chronos shell and ran <code class="language-plaintext highlighter-rouge">crossystem</code>. Every single flag that should have come from vboot NVRAM came back like this:</p>

<div class="language-plaintext highlighter-rouge"><div class="highlight"><pre class="highlight"><code>Flashrom invocation failed (exit status 127): flashrom -p host -r -i RW_NVRAM:/tmp/vb2_flashrom.Ae2oKY
backup_nvram_request    = (error)
[...]
Flashrom invocation failed (exit status 127): [...]
dev_boot_usb            = (error)
</code></pre></div></div>

<p>127 is “command not found.” The auto-updated firmware on this puck doesn’t ship the <code class="language-plaintext highlighter-rouge">flashrom</code> binary in PATH. <code class="language-plaintext highlighter-rouge">crossystem</code> shells out to flashrom to read and write the RW_NVRAM region of the SPI flash, and when flashrom isn’t there, <code class="language-plaintext highlighter-rouge">crossystem</code> silently reports <code class="language-plaintext highlighter-rouge">(error)</code> for every NVRAM-backed field. <code class="language-plaintext highlighter-rouge">enable_dev_usb_boot</code> ALSO shells out to crossystem under the hood, gets the same <code class="language-plaintext highlighter-rouge">(error)</code>, and prints SUCCESS anyway. Lovely.</p>

<p>So the actual wall, the thing that had been making me think the firmware had a signature watchdog at the kernel-handoff layer, was a missing binary on the production image plus a script that doesn’t check its own return codes.</p>

<p>This is also why kkestell’s procedure works on never-online pucks. The original 2017 firmware shipped with flashrom in PATH. The auto-updated newer firmware dropped it, presumably because Google figured no consumer would ever need flashrom on their router. They were right about consumers, wrong about me.</p>

<h2 id="the-fix">the fix</h2>

<p>Once you know flashrom is missing, the answer’s obvious. Reflash the original factory firmware. The version that has flashrom. Then run <code class="language-plaintext highlighter-rouge">enable_dev_usb_boot</code> from that.</p>

<p>Google publishes the official Gale recovery image at:</p>

<div class="language-plaintext highlighter-rouge"><div class="highlight"><pre class="highlight"><code>https://dl.google.com/dl/edgedl/chromeos/recovery/chromeos_9334.41.3_gale_recovery_stable-channel_mp.bin.zip
</code></pre></div></div>

<p>70 MB zip, 1.84 GB extracted, sha1 <code class="language-plaintext highlighter-rouge">3914470f0f3417cbd876c238fe495d65562c4f6e</code>. Same image OnHub Recovery Utility would download, except now you can just <code class="language-plaintext highlighter-rouge">dd</code> it. (I tried OnHub Recovery first. It refused to install on Chrome 131 with some opaque manifest error. The direct URL works.)</p>

<p>Full recipe:</p>

<ol>
  <li>Open the case, find the WP screw, remove it. The washer is the giveaway, it bridges multiple pads.</li>
  <li>Write the Gale recovery image to a USB stick: <code class="language-plaintext highlighter-rouge">sudo dd if=chromeos_9334.41.3_gale_recovery_stable-channel_mp.bin of=/dev/rdisk4 bs=1m conv=sync</code>. The <code class="language-plaintext highlighter-rouge">conv=sync</code> matters because the file isn’t a multiple of 512 bytes and rdisk on macOS rejects partial sector writes.</li>
  <li>Plug the USB stick into a USB-C PD hub, plug the puck into the hub, hold the puck’s external reset button while connecting, release at amber LED, wait five minutes for solid blue. Fresh factory ChromeOS install with flashrom present.</li>
  <li>Unplug from the hub. Plug the SuzyQ between the puck and your Mac. Hold reset, plug SuzyQ, release at amber, press SW7, wait three seconds, press SW7 again. That puts the puck in recovery mode; the second SW7 press confirms “yes, enable dev mode”; the TPM stores the flag; the puck cold-reboots into dev mode.</li>
  <li>Wait three to five minutes. ChromeOS does a first-boot-in-dev-mode powerwash that recreates the stateful partition. The puck will cycle through the boot a few times in this period and the <code class="language-plaintext highlighter-rouge">localhost login:</code> prompt will flash on the serial console for a second each cycle before disappearing. Resist the urge to type. If you type <code class="language-plaintext highlighter-rouge">chronos</code> during this period, depthcharge interprets the keypresses as menu navigation and you’ll accidentally toggle dev mode back off and have to redo the SW7 dance. Ask me how I know.</li>
  <li>Once <code class="language-plaintext highlighter-rouge">localhost login:</code> sticks (stays on screen instead of flashing), send <code class="language-plaintext highlighter-rouge">chronos\r</code> and you get a shell with no password.</li>
  <li>Run:
    <div class="language-plaintext highlighter-rouge"><div class="highlight"><pre class="highlight"><code>sudo enable_dev_usb_boot
sudo crossystem dev_boot_usb=1 dev_boot_signed_only=0 dev_default_boot=usb
</code></pre></div>    </div>
    <p>Confirm with <code class="language-plaintext highlighter-rouge">sudo crossystem dev_boot_usb</code> returning <code class="language-plaintext highlighter-rouge">1</code>.</p>
  </li>
  <li><a href="https://github.com/kkestell/openwrt-on-google-wifi">Standard kkestell flow</a> from here. Write OpenWrt’s <code class="language-plaintext highlighter-rouge">factory.bin</code> to the same USB stick, swap from SuzyQ back to the hub, SW7 dance, USB-boots OpenWrt steady-blue this time, no purple revert. <code class="language-plaintext highlighter-rouge">scp -O factory.bin root@192.168.1.1:/tmp/</code>, <code class="language-plaintext highlighter-rouge">dd if=/dev/zero bs=512 seek=7634911 of=/dev/mmcblk0 count=33</code>, <code class="language-plaintext highlighter-rouge">dd if=/tmp/...factory.bin of=/dev/mmcblk0 &amp;&amp; sync &amp;&amp; reboot</code>. Pull the USB stick, wait thirty seconds, boots OpenWrt from internal eMMC. Done.</li>
</ol>

<p>Ten minutes per puck once you’ve done it once. Factory recovery is the slow step (five minutes). SW7 dance plus chronos login plus the four commands is maybe two minutes. Rest is cable swapping and waiting for the LED to settle. I flashed five walled pucks back-to-back this way and all worked first try.</p>

<h2 id="what-i-tested-to-make-sure-no-step-was-unnecessary">what i tested to make sure no step was unnecessary</h2>

<p>I was paranoid about publishing a procedure that’s a superset of what actually works. Claude was happily writing me long recipes that may or may not have included redundant steps. On the fourth puck I did A/B tests on the two steps that seemed most “maybe this is just superstition.”</p>

<p><strong>Did I really need to remove the WP screw?</strong> Tried chronos login with the screw still installed. Both UART interfaces (EC_PD and AP) returned <code class="language-plaintext highlighter-rouge">Errno 60: Operation timed out</code> on every write attempt. Without the screw out you can’t type at the puck. So yes, the screw has to come out.</p>

<p><strong>Did I really need to reflash factory firmware?</strong> Tried skipping that step on the same puck (WP screw out, SW7 dance to enable dev mode, straight to chronos login attempt). ChromeOS got stuck in the powerwash cycle, never stabilized at <code class="language-plaintext highlighter-rouge">localhost login:</code>. Waited 12 minutes; the login prompt flashed on screen during each boot cycle but Linux rebooted before chronos shell could finish setup. Hypothesis: the auto-updated image is missing not just flashrom but other components the powerwash flow needs. After running the factory recovery flash, powerwash completes in 3-5 minutes and chronos sticks.</p>

<p>Two confirmed-necessary steps, no shortcuts found. There may still be a shortcut for pucks that were never online (firmware never auto-updated, flashrom still present, you can skip the recovery flash). I don’t have an offline-since-2017 puck to test on. If you do, try the chronos shell on the original firmware after just removing the WP screw and the SW7 dance, before doing the recovery flash. Let me know.</p>

<h2 id="things-that-surprised-me">things that surprised me</h2>

<p>This was supposed to be a serial-console story. I bought the cable to watch the boot and figure out why my Mac wasn’t getting an ethernet link to a USB-booted OpenWrt puck. The walled-puck unlock was a side quest that ate the main quest.</p>

<p>The wall isn’t a firmware-policy wall, it’s a missing-binary wall, which is much dumber and much more fixable. The three rabbit holes all dead-ended at “this would be the right way to do this on a Chromebook, but Gale doesn’t expose the interface.” They weren’t wasted, exactly. They were just looking in the wrong drawer. And they were necessary to convince me the unlock had to be hardware-flavored, which is the only reason I bothered looking at the screw.</p>

<p>The HW write-protect screw doing double duty as a CCD-UART unlock was not in any documentation I could find. <a href="https://docs.mrchromebox.tech/docs/support/unbricking/unbrick-ch341a.html">MrChromebox</a> describes WP screw removal in the context of unbricking with a CH341A. The <a href="https://chromium.googlesource.com/chromiumos/third_party/hdctools/+/HEAD/docs/ccd.md">chromium hdctools docs</a> mention CCD UART access as a capability you flip on with <code class="language-plaintext highlighter-rouge">gsctool</code> (which Gale doesn’t have). Nobody I read said “hey, on this device, the screw also unlocks the UART writes.” It’s possible this is well-known in the Chromebook hacking community and I just didn’t find the right thread. If you know more, I’d love to hear from you.</p>

<p><code class="language-plaintext highlighter-rouge">enable_dev_usb_boot</code> printing SUCCESS while silently failing is a UX choice. I get why the script doesn’t want to scare you, but a non-zero exit code when the underlying crossystem call returned (error) would have saved me about two hours.</p>

<p>The rubberducking-with-an-AI thing works, but the actual skill isn’t “make it look.” Claude is happy to look. Claude is also happy to hallucinate a solution that keeps you happy, or to confidently give up so the conversation keeps moving. Both feel like progress. Both are wrong when there’s something on the other side of the wall.</p>

<p>What engineers with the gray hairs and the horror stories know, and what an AI doesn’t, is that the wall almost always has more behind it. The job is to trust that hunch and then make sure you’ve actually ruled out every unpursued avenue before you let “this is impossible” stand. Stay methodical, keep redirecting, exhaust the actual surface area. The AI is a great pair for that part: patient, fast, doesn’t get tired, doesn’t get embarrassed. But it’s not going to tell you when to keep looking. That part is still on you.</p>

<h2 id="code-and-notes">code and notes</h2>

<p>Everything is at <a href="https://github.com/jconnolly/google-wifi-suzyq-console-macos">github.com/jconnolly/google-wifi-suzyq-console-macos</a>:</p>

<ul>
  <li><code class="language-plaintext highlighter-rouge">tools/gale-sniff-all</code> is the read-only serial sniffer with auto-reconnect across power cycles. The auto-reconnect matters because the SuzyQ also powers the puck so power-cycling drops the USB device.</li>
  <li><code class="language-plaintext highlighter-rouge">tools/gale-spi-probe</code> and <code class="language-plaintext highlighter-rouge">tools/gale-ctrl-fuzz</code> are the diagnostic tools from rabbit holes 1 and 2. Neither is necessary for actual flashing; they’re there to document what doesn’t work.</li>
  <li><code class="language-plaintext highlighter-rouge">docs/unlock-walled-puck.md</code> is the recipe in tutorial form.</li>
  <li><code class="language-plaintext highlighter-rouge">docs/flashing.md</code> covers the standard kkestell flow (what works on never-walled pucks) with notes on what the serial trace should look like at each step.</li>
  <li><code class="language-plaintext highlighter-rouge">captures/</code> has full serial traces from the entire journey, walled and unwalled, organized per session. The <code class="language-plaintext highlighter-rouge">flash-session-20260526-1913/</code> directory in particular shows the wall in action and the eventual unlock.</li>
</ul>

<p>If you have walled Gale pucks and want to mesh them with OpenWrt, the recipe will probably just work. If you have older firmware pucks, none of this is needed and you can follow kkestell’s original guide. If you’re on Linux and <code class="language-plaintext highlighter-rouge">/dev/ttyUSB*</code> shows up the moment you plug the SuzyQ in, please send me a thank-you photo, I was very jealous.</p>

<h2 id="sources-i-leaned-on">sources i leaned on</h2>

<ul>
  <li><a href="https://github.com/kkestell/openwrt-on-google-wifi">kkestell’s OpenWrt-on-Google-WiFi guide</a></li>
  <li><a href="https://forum.openwrt.org/t/finally-installed-openwrt-on-my-google-wifi-ac-1304/183541">papdee’s original procedure on the OpenWrt forum</a></li>
  <li><a href="https://www.ebay.com/itm/316024978790">chocolateloverraj’s eBay SuzyQ listing</a> and <a href="https://github.com/ChocolateLoverRaj/gsc-debug-board">gsc-debug-board on GitHub</a></li>
  <li><a href="https://chromium.googlesource.com/chromiumos/third_party/hdctools/+/HEAD/docs/ccd.md">chromium hdctools CCD documentation</a></li>
  <li><a href="https://docs.mrchromebox.tech/docs/support/unbricking/unbrick-ch341a.html">MrChromebox unbricking with CH341A</a></li>
  <li><a href="https://github.com/coreboot/chrome-ec/blob/master/chip/stm32/usb_spi.h">coreboot/chrome-ec <code class="language-plaintext highlighter-rouge">chip/stm32/usb_spi.h</code></a> for the raiden protocol details</li>
</ul>]]></content><author><name>John Connolly</name><email>john@ollyconn.com</email></author><category term="hardware" /><category term="openwrt" /><category term="google-wifi" /><category term="gale" /><category term="ac-1304" /><category term="openwrt" /><category term="suzyq" /><category term="ccd" /><category term="hardware-hacking" /><category term="macos" /><category term="ipq4019" /><summary type="html"><![CDATA[I had six bricked Google WiFi pucks. Claude was sure five of them needed a $30 SPI programmer and an older coreboot that nobody publishes. I was poking around the open case looking for any other angle when I noticed a silver screw with a conductive washer next to the H1 chip. Pulled it. Told Claude. Turned out that was basically the whole game.]]></summary><media:thumbnail xmlns:media="http://search.yahoo.com/mrss/" url="https://ollyconn.com/assets/img/og/unbricking-six-google-wifi-pucks.png" /><media:content medium="image" url="https://ollyconn.com/assets/img/og/unbricking-six-google-wifi-pucks.png" xmlns:media="http://search.yahoo.com/mrss/" /></entry><entry><title type="html">Keep it light: create an animated gif</title><link href="https://ollyconn.com/2015/10/19/keep-it-light-create-an-animated-gif/" rel="alternate" type="text/html" title="Keep it light: create an animated gif" /><published>2015-10-19T04:00:00+00:00</published><updated>2015-10-19T04:00:00+00:00</updated><id>https://ollyconn.com/2015/10/19/keep-it-light-create-an-animated-gif</id><content type="html" xml:base="https://ollyconn.com/2015/10/19/keep-it-light-create-an-animated-gif/"><![CDATA[<h2 id="rationale">Rationale</h2>

<hr />

<p>Maybe you’re a lurker on <a href="https://reddit.com">reddit</a>, or maybe you’ve got a coworker who is always circulating animated gifs of <a href="https://media.giphy.com/media/36in05WSMy7vO/giphy.gif">kittens dressed up as pandas</a>. Either way, if you’ve ended up here, you’re probably wondering how exactly those gifs are made. More than likely though, you’re a CSE300 classmate, so hello!</p>

<p>This tutorial shows how to use commonly available command line tools to create <em>your own</em> animated gifs to share.</p>

<h2 id="prerequisites">Prerequisites</h2>

<hr />

<p>The following instructions presume you’re working with OSX, though if you’re using linux you should have an easy time following along. If you’ve already got <strong>youtube-dl ffmpeg and gifsicle</strong> installed you should skip down to “Create the gif”.</p>

<h2 id="01-launch-the-terminal">0.1) Launch the terminal</h2>

<p>Launch the terminal by hitting ⌘+[spacebar] and typing “Terminal” in Spotlight Search:</p>

<p><img src="/images/keep-it-light-create-an-animated-gif/Terminal.png" alt="" /></p>

<h2 id="02-install-homebrew">0.2) Install <a href="https://brew.sh/">homebrew</a></h2>

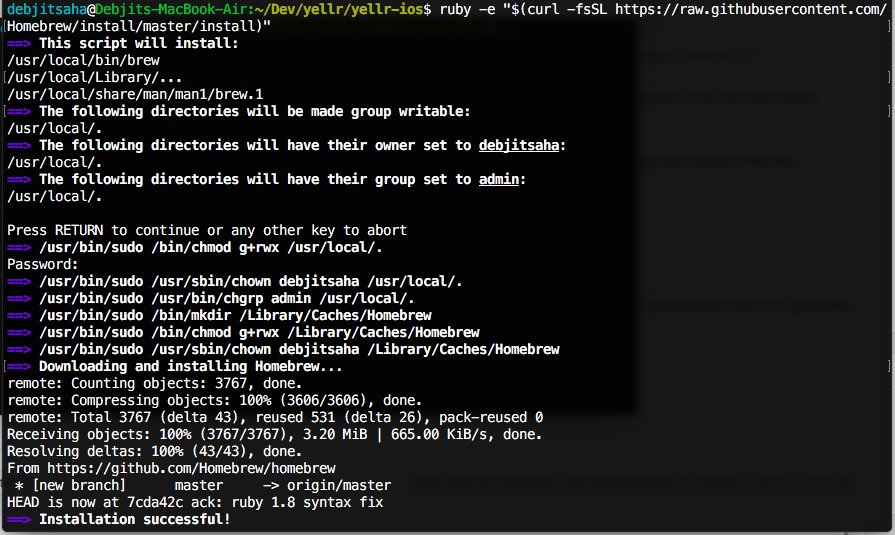
<p>Install <a href="https://brew.sh/">homebrew</a>. It’s a package manager for installing fun tools for the command line. Paste this into your terminal:</p>

<div class="language-plaintext highlighter-rouge"><div class="highlight"><pre class="highlight"><code>ruby -e "$(curl -fsSL https://raw.githubusercontent.com/Homebrew/install/master/install)"
</code></pre></div></div>

<h2 id="enter-your-password">Enter your password</h2>

<p>homebrew will verify that you want to install, just hit [Enter]. The installer will then prompt you for your password. Don’t worry, it’s just trying to install itself into a directory that requires your permission to create. Enter your password:</p>

<p><img src="/images/keep-it-light-create-an-animated-gif/Homebrew.png" alt="" /></p>

<p>homebrew will download and install itself and you’ll return to your shell prompt.</p>

<h2 id="03-install-ffmpeg-youtube-dl-and-gifsicle">0.3) Install ffmpeg, youtube-dl, and gifsicle</h2>

<p>Now that you’ve got homebrew, you can install the software we’ll be using for this tutorial. Copy below and enter it into your Terminal:</p>

<div class="language-plaintext highlighter-rouge"><div class="highlight"><pre class="highlight"><code>brew install youtube-dl ffmpeg gifsicle
</code></pre></div></div>

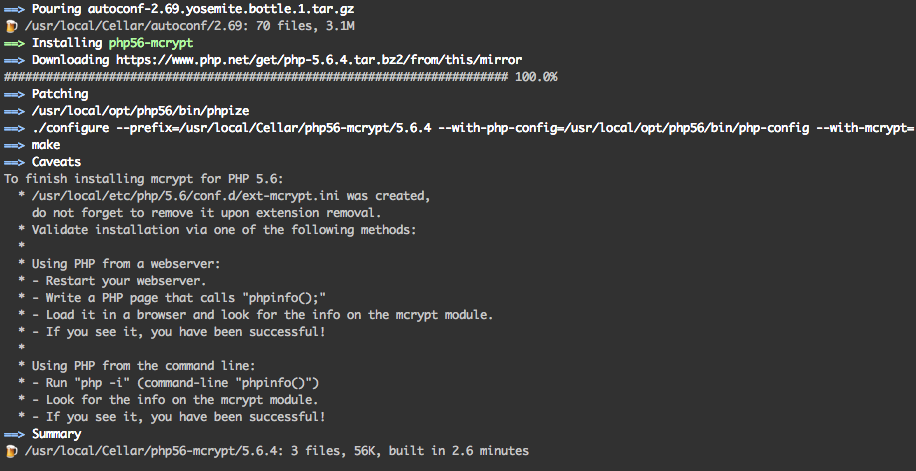
<p>You’ll see output similar to below, where homebrew is fetching and downloading the software and its dependencies. This may take a few minutes, especially if you didn’t have homebrew previously installed:</p>

<p><img src="/images/keep-it-light-create-an-animated-gif/Install.png" alt="" /></p>

<p>Congratulations! You now have the software required to follow the remainder of the tutorial.</p>

<h2 id="create-the-gif">Create the gif</h2>

<hr />

<p>We’re now ready to create the gif.</p>

<h2 id="1-find-your-youtube-video">1) Find your youtube video</h2>

<p>Find the youtube clip you’d like to immortalize as an animated gif. I chose a clip from one of my favorite movies, <a href="https://www.imdb.com/title/tt0071853/">Monty Python and the Holy Grail</a>.</p>

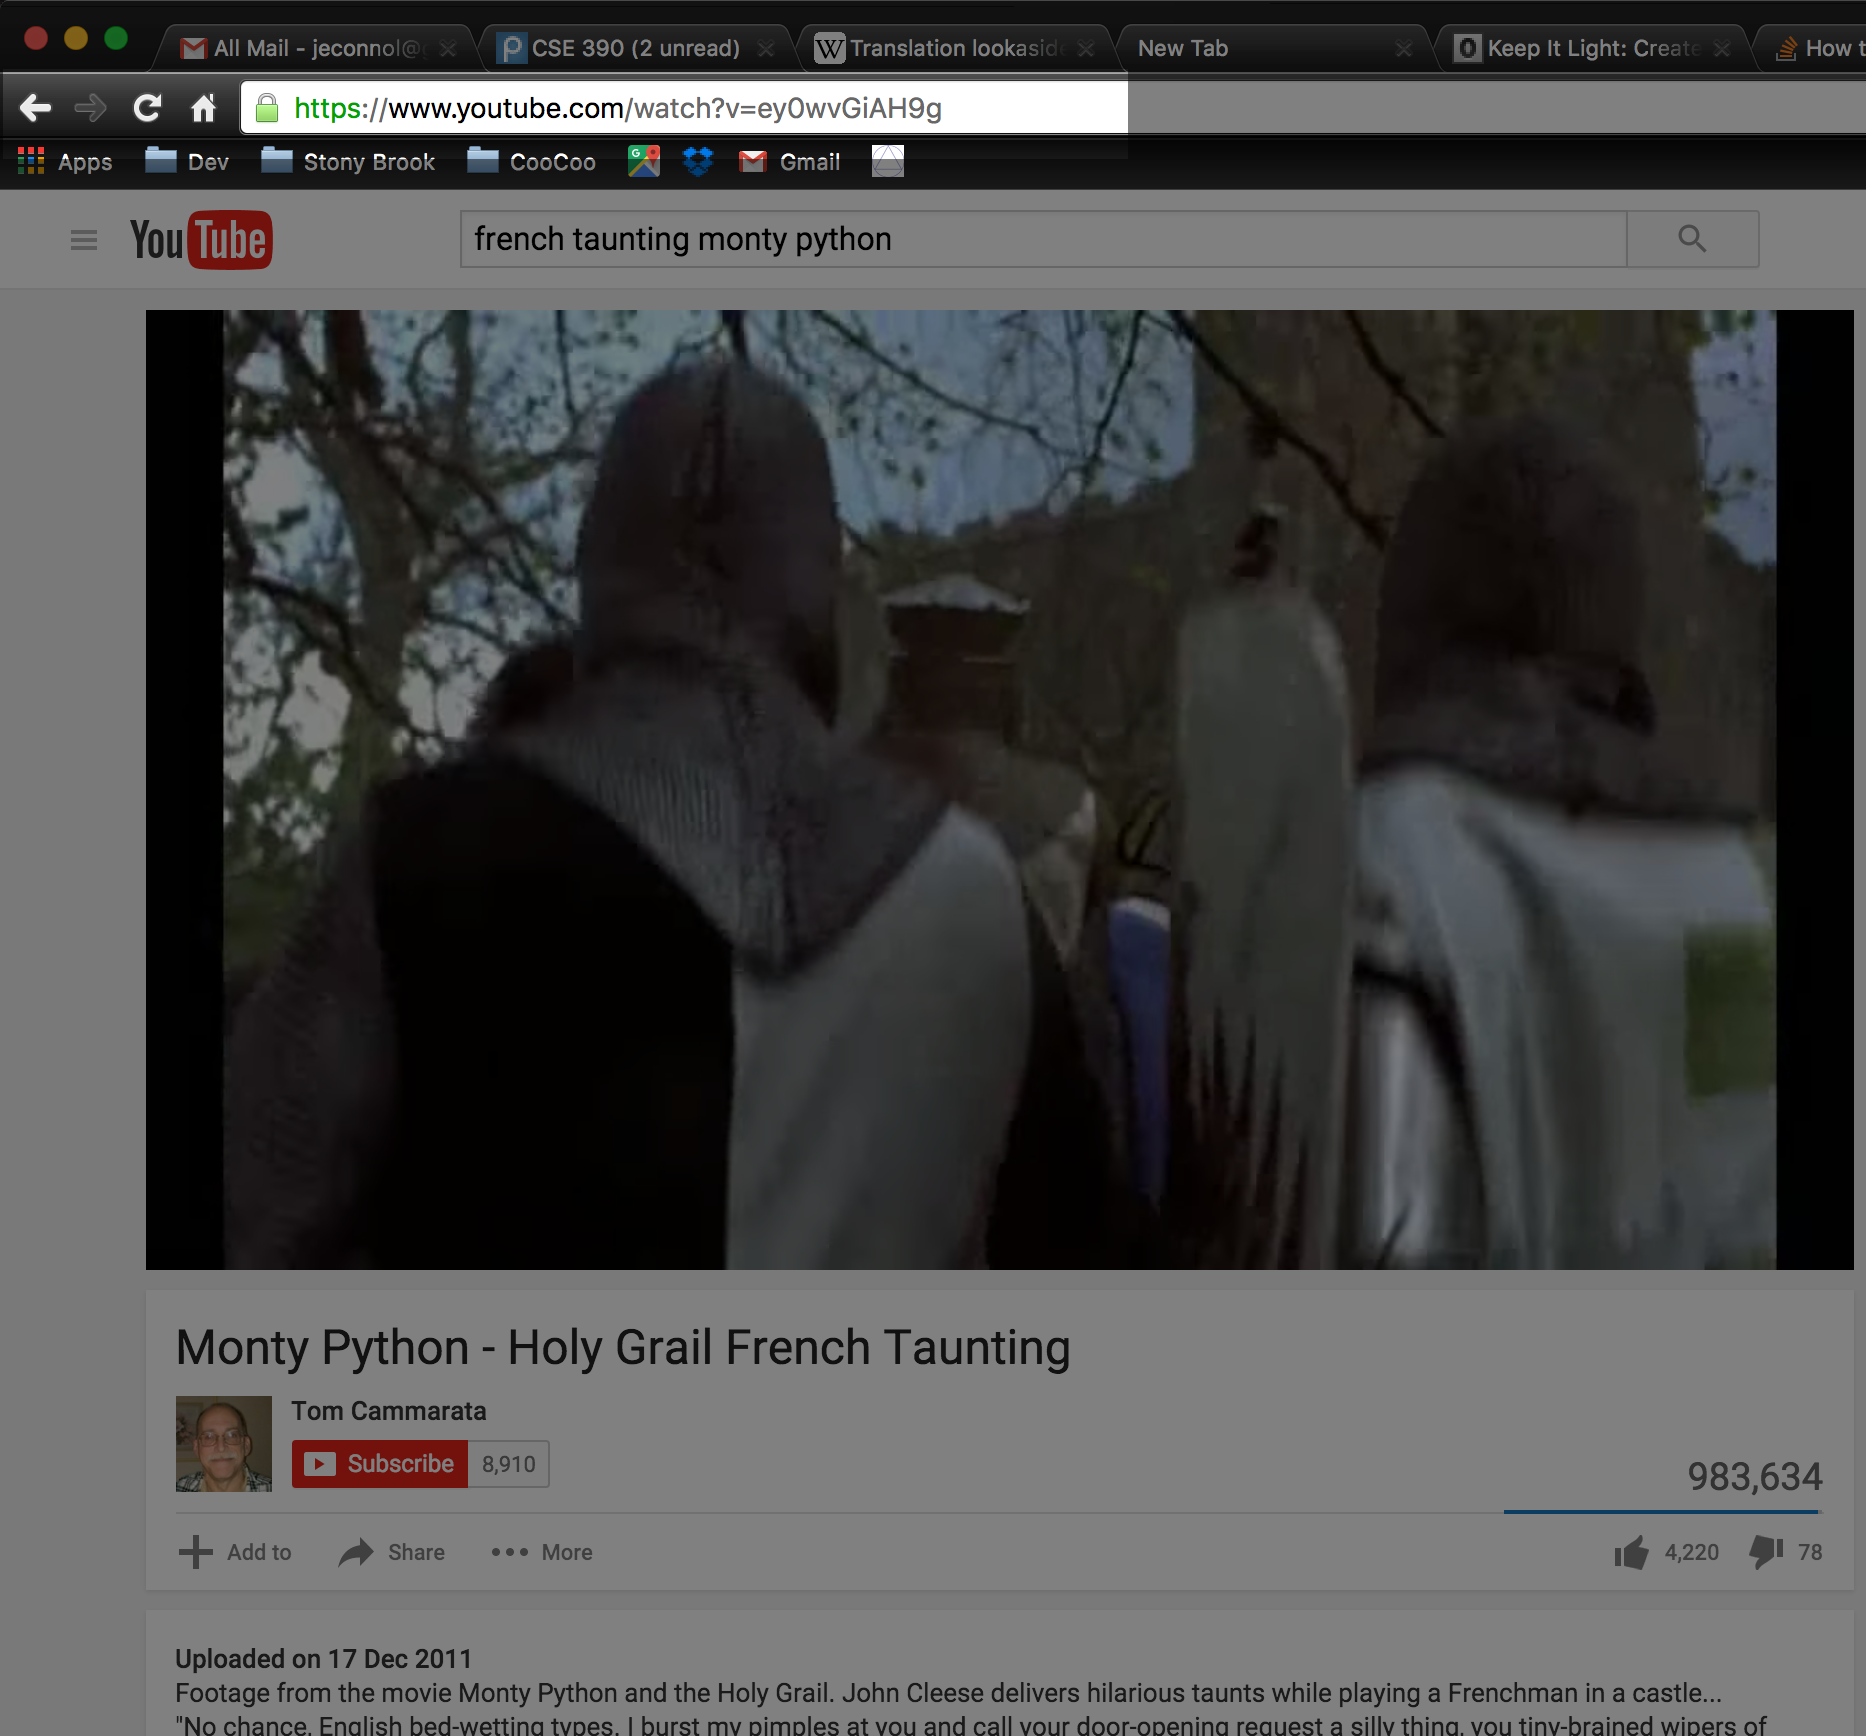
<p>While at the video of your choice, copy the URL from the address bar in your browser.</p>

<p><img src="/images/keep-it-light-create-an-animated-gif/Youtube.png" alt="" /></p>

<h2 id="2-download-it">2) Download it</h2>

<p>In your terminal window, change directories into <strong>/tmp</strong> where we’ll be doing our work.</p>

<div class="language-plaintext highlighter-rouge"><div class="highlight"><pre class="highlight"><code>cd /tmp
</code></pre></div></div>

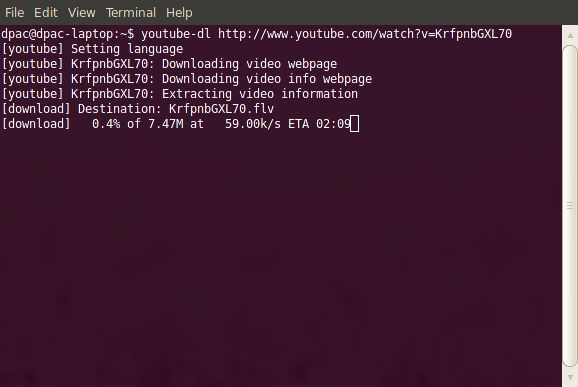
<p>Now download your clip with youtube-dl, replacing <YOUR_URL> with the URL you copied earlier.</YOUR_URL></p>

<div class="language-plaintext highlighter-rouge"><div class="highlight"><pre class="highlight"><code>youtube-dl  -o out.mp4
</code></pre></div></div>

<p><img src="/images/keep-it-light-create-an-animated-gif/Youtubedl.png" alt="" /></p>

<h2 id="3-edit-it-with-ffmpeg">3) Edit it with ffmpeg</h2>

<p>Here we’ll edit the video and encode it into a looping gif format. You’ll want to note the time in the clip you selected before proceeding. In my case, I want the moment where John Cleese, as a French soldier, childishly taunts Arthur from his castle perch, at <em>2 minutes</em>, <em>0 seconds</em> and <em>500 milliseconds</em> (note that it’s dot for milliseconds). If you’re not sure of the exact time, don’t worry, you can do the below a few times and find the exact time:</p>

<div class="language-plaintext highlighter-rouge"><div class="highlight"><pre class="highlight"><code>ffmpeg -i out.mp4 -s 600x400 -pix_fmt rgb8 -f gif -ss 00:02:00.500 -t 4 - | gifsicle --optimize=3 --delay=3 &gt; ~/Desktop/out.gif
</code></pre></div></div>

<p><img src="/images/keep-it-light-create-an-animated-gif/ffmpeg.png" alt="" /></p>

<p>The only values you’re likely to want to change are the <strong>-ss 00:02:00.500</strong> and <strong>-t 4</strong> fields. Adjust those to indicate what section of the whole youtube clip you’d like to select for your gif. A little trial and error will help you figure out those fields.</p>

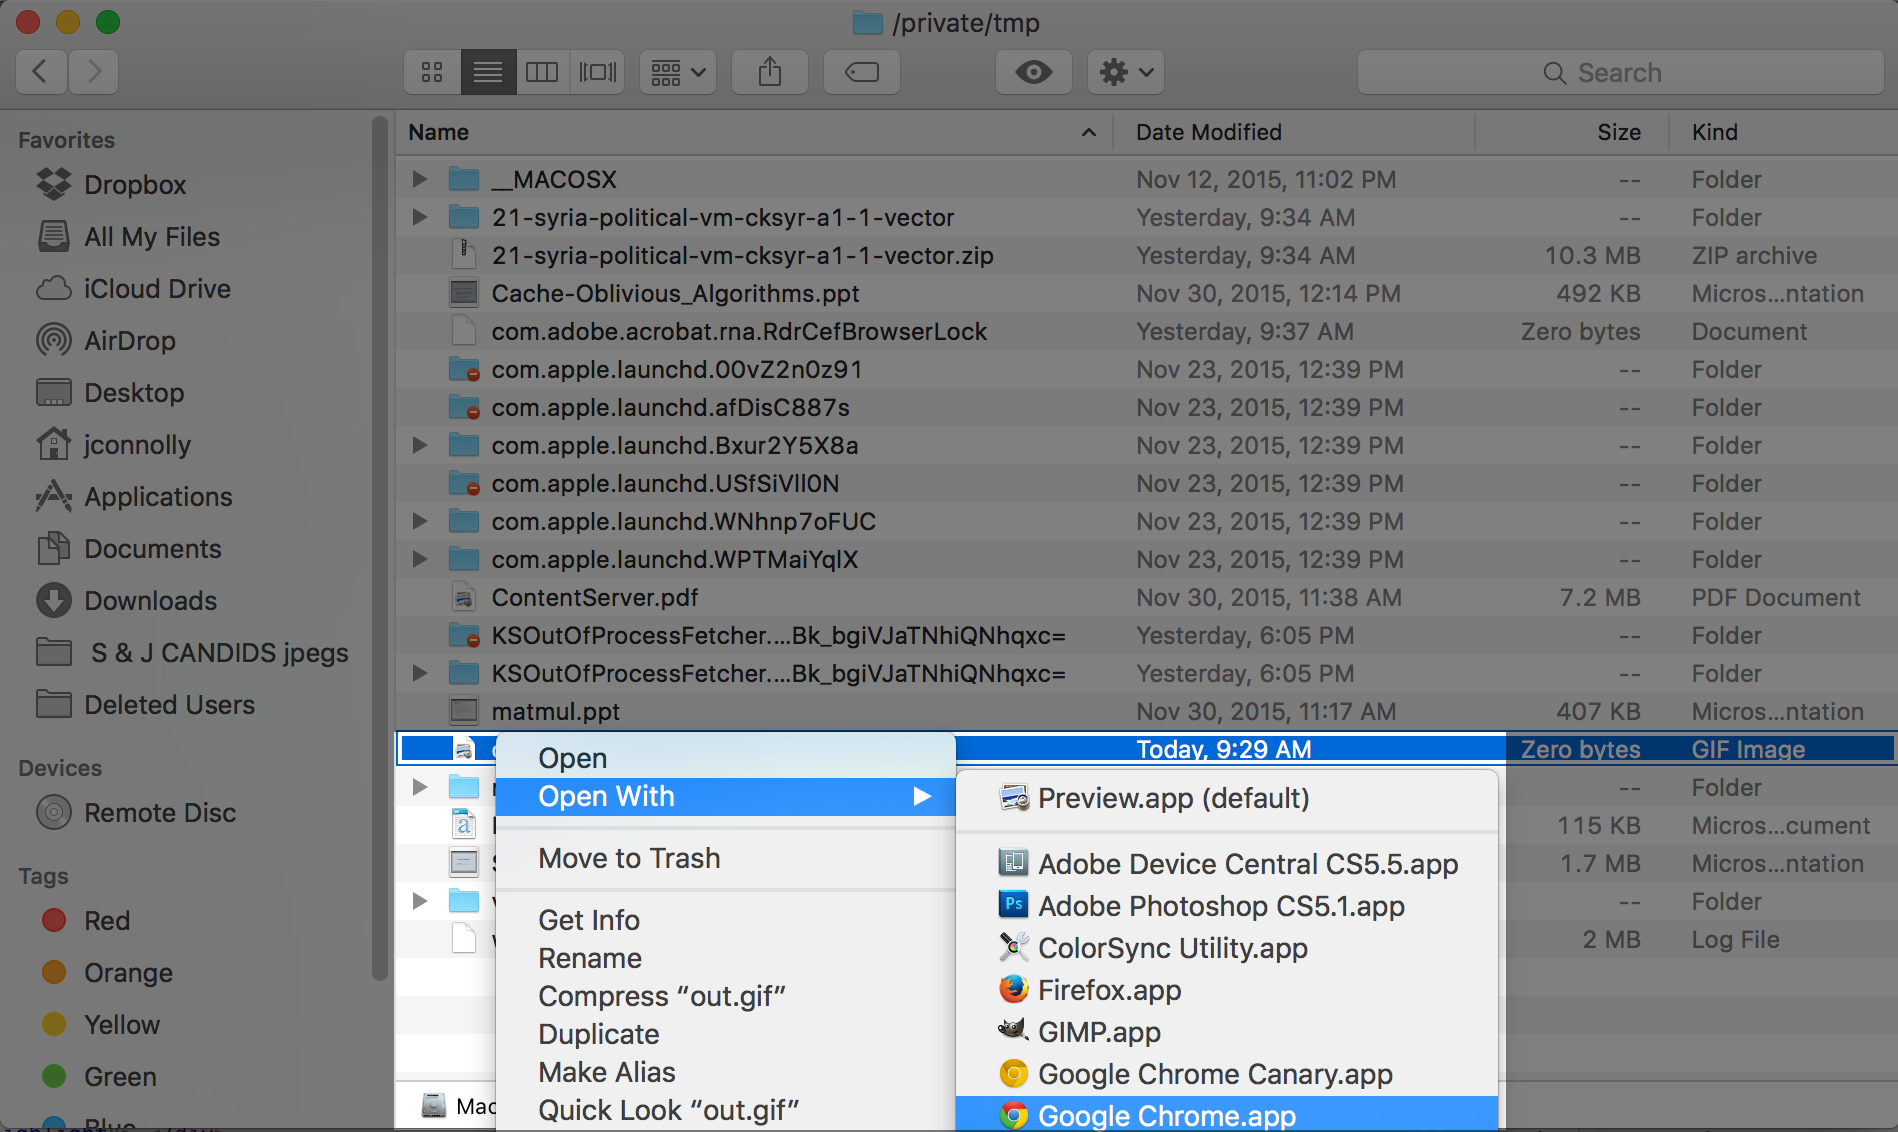
<p>That’s it! To view your gif, I suggest opening it with your browser. Open <strong>Finder</strong> to your desktop, right click on out.gif and select “Google Chrome” or your other favorite browser. Then if you want to make edits to the timeline, you can just refresh the page.</p>

<p><img src="/images/keep-it-light-create-an-animated-gif/Finder.png" alt="" /></p>

<h2 id="4-upload-it-to-imgur">4) Upload it to imgur</h2>

<p>Now that you’ve got your gif, head over to <a href="https://imgur.com">imgur</a> to upload it and <a href="https://imgur.com/0YD6rnw">forever immortalize your gif in history.</a>.</p>

<p><a href="https://imgur.com/0YD6rnw">View post on imgur.com</a></p>

<p>Happy gifing!</p>]]></content><author><name>John Connolly</name><email>john@ollyconn.com</email></author><category term="tutorial" /><category term="ffmpeg" /><category term="youtube-dl" /><category term="gifsicle" /><category term="macos" /><category term="gif" /><summary type="html"><![CDATA[Rationale]]></summary></entry></feed>